SmartEnroll KYC Flow - End User Guide
The SmartEnroll KYC Flow is a comprehensive identity verification process that guides end-users through a secure onboarding experience. This flow combines multiple verification methods including email validation, phone verification, document scanning, and biometric authentication to ensure the highest level of security and compliance.
Overview
The SmartEnroll KYC Flow is designed to be intuitive and user-friendly while maintaining strict security standards. The process typically takes a few minutes to complete and guides users through each verification step with clear instructions and visual feedback.
Flow Overview
The complete KYC verification process consists of the following steps:
- Account Registration - Create an account with personal information
- Email Verification - Verify email address with OTP code
- Phone Verification - Verify phone number via SMS or WhatsApp
- KYC Instructions - Review instructions for document and biometric verification
- Document Selection - Choose the type of identity document to verify
- Document Upload - Capture and upload front and back of identity document
- Document Processing - OCR extraction and validation of document data
- Biometric Verification - Complete liveness detection and facial recognition
- Completion - Successful KYC verification confirmation
Step-by-Step Guide
Step 1: Account Registration
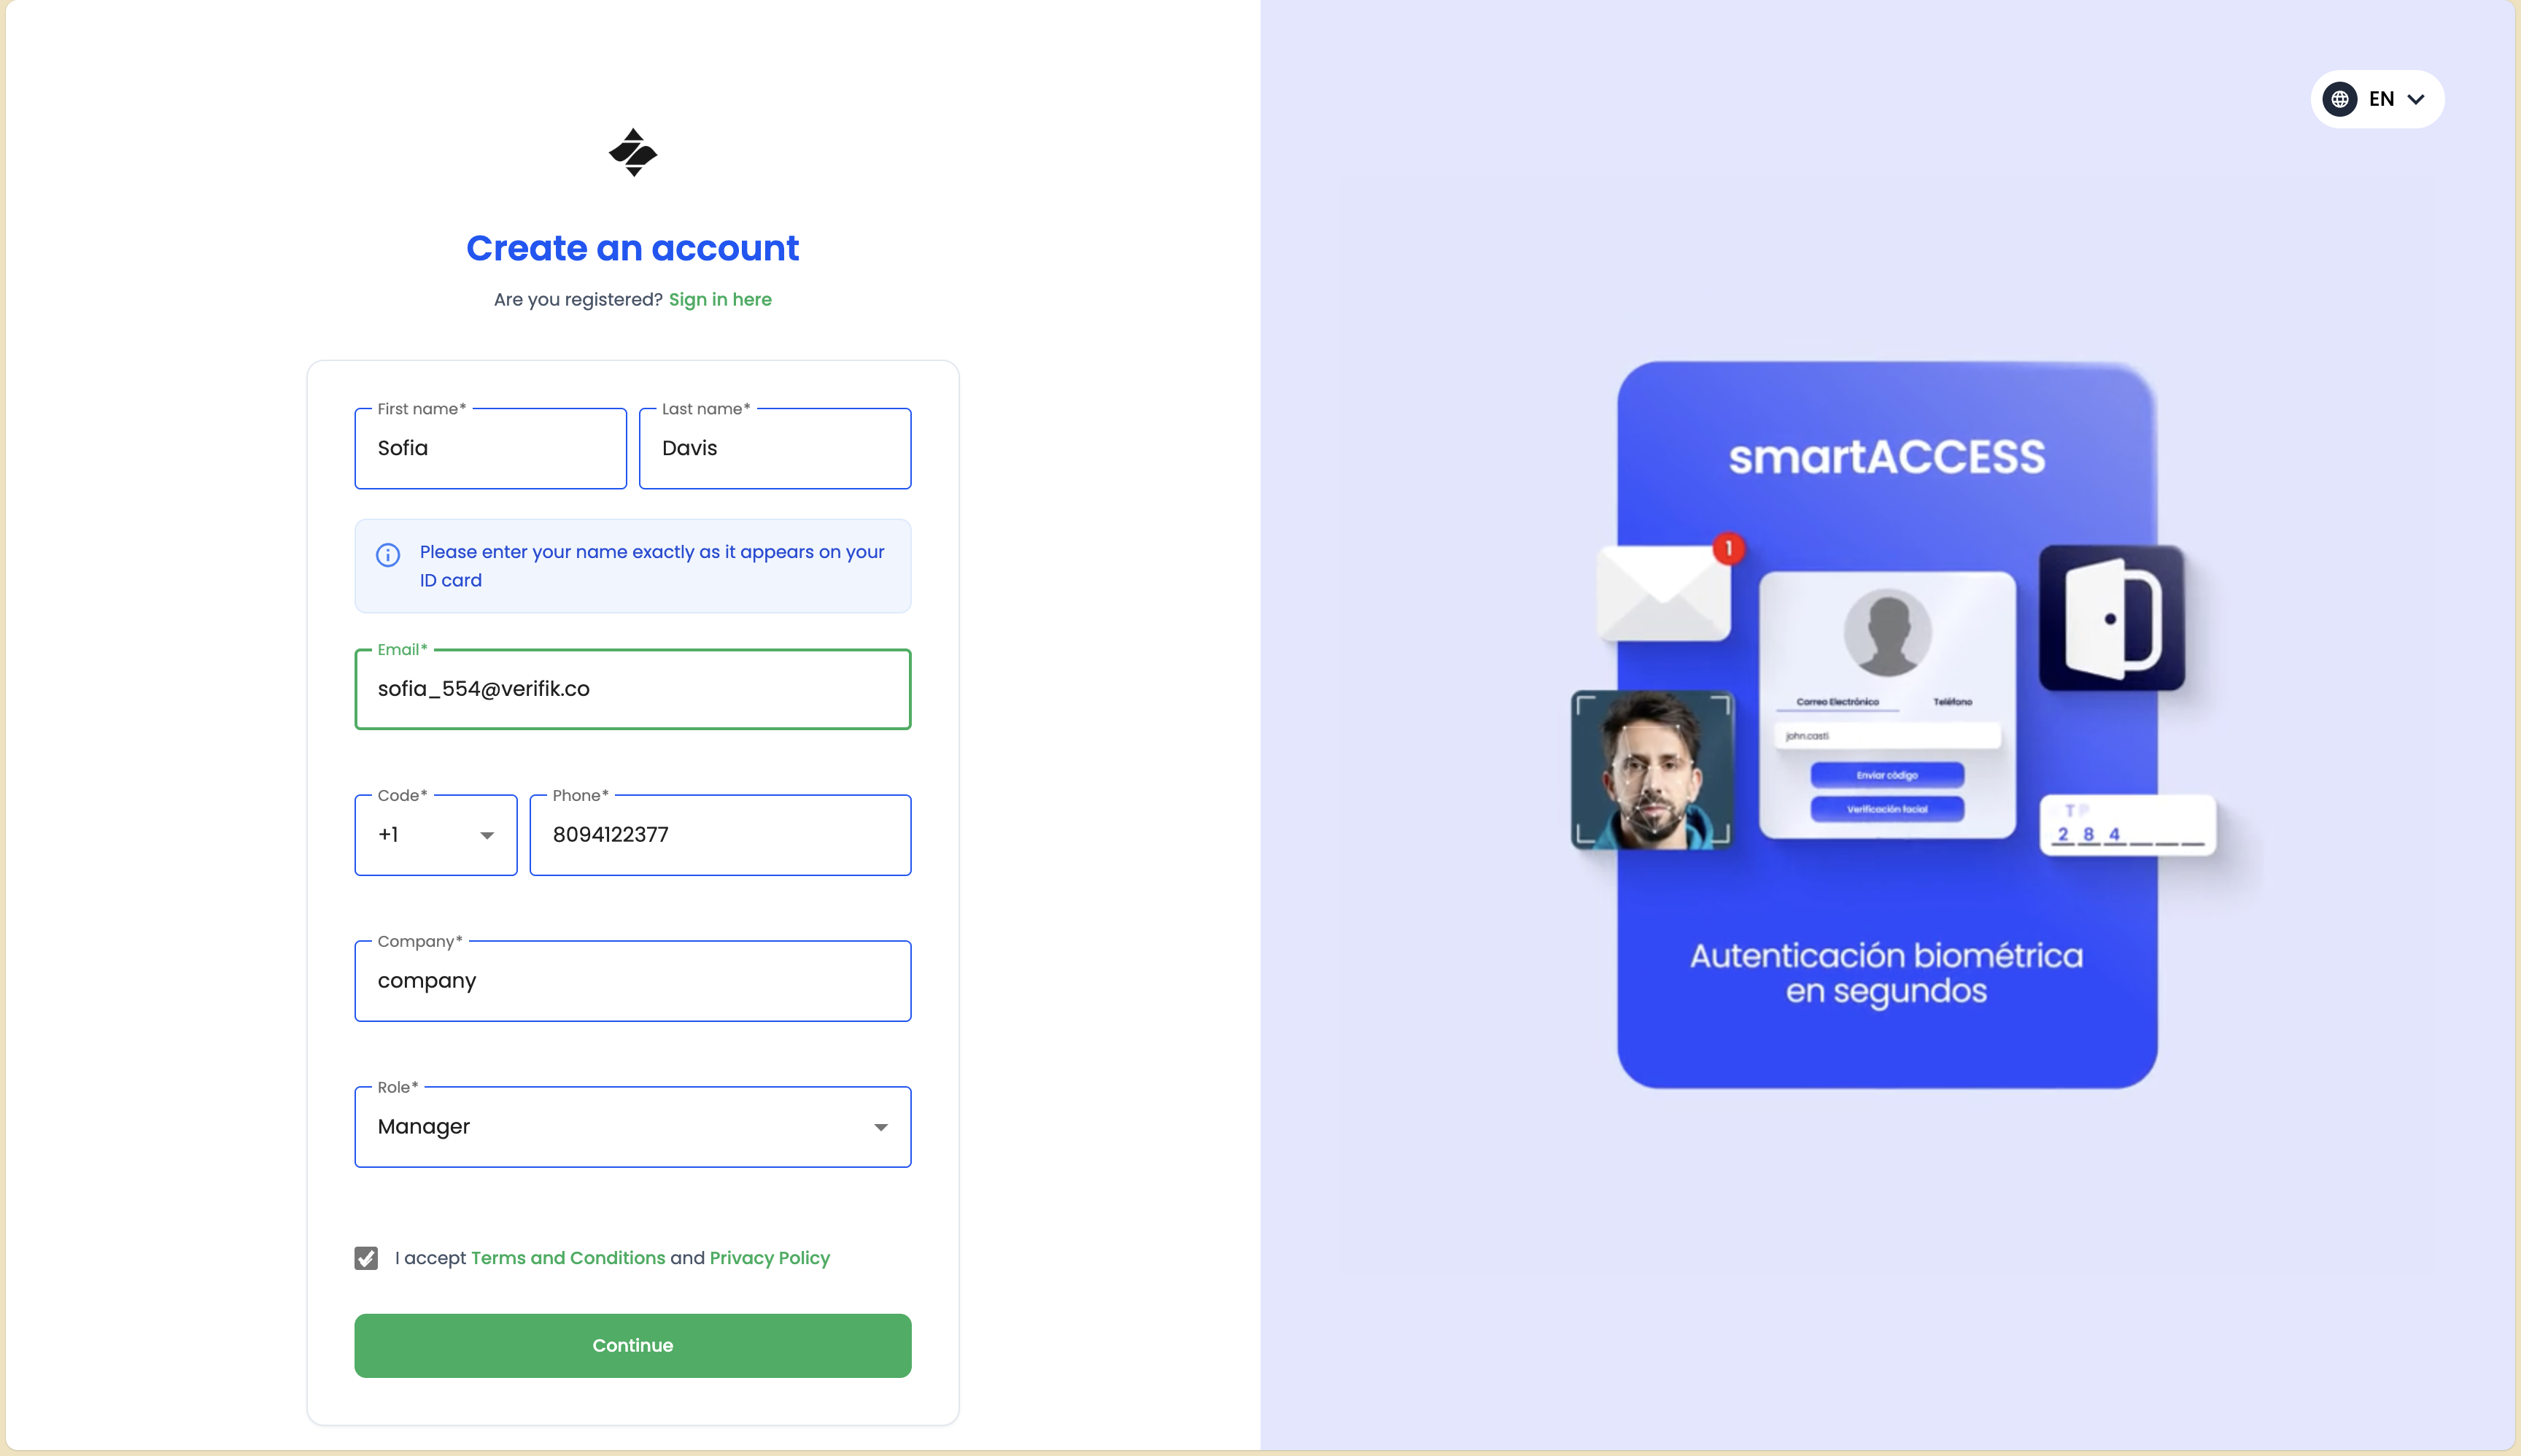
The onboarding process begins with creating an account. Users are required to provide essential information:
Required Information
-
Name Fields:
- First Name: User's first name (e.g., "Sofia")
- Last Name: User's last name (e.g., "Davis")
- :::important Important Users must enter their name exactly as it appears on their ID card to ensure successful verification. :::
-
Contact Information:
- Email Address: A valid email address that will be used for verification (e.g., "sofia_554@verifik.co")
- Phone Number: Phone number with country code selection (e.g., +1 for United States)
- The phone number will be verified in a subsequent step
-
Optional Fields (if enabled by the organization):
- Company: User's company name
- Role: User's job role or position (selected from dropdown)
Legal Agreements
Before proceeding, users must:
- Accept Terms and Conditions: Checkbox to accept the Terms and Conditions
- Accept Privacy Policy: Checkbox to accept the Privacy Policy
Both agreements are accessible via clickable links, allowing users to review the full legal documents before accepting.
Make sure all information is accurate and matches your official documents. Any discrepancies may cause delays in the verification process.
Once all required fields are completed and agreements are accepted, users can click the Continue button to proceed to email verification.
Step 2: Email Verification
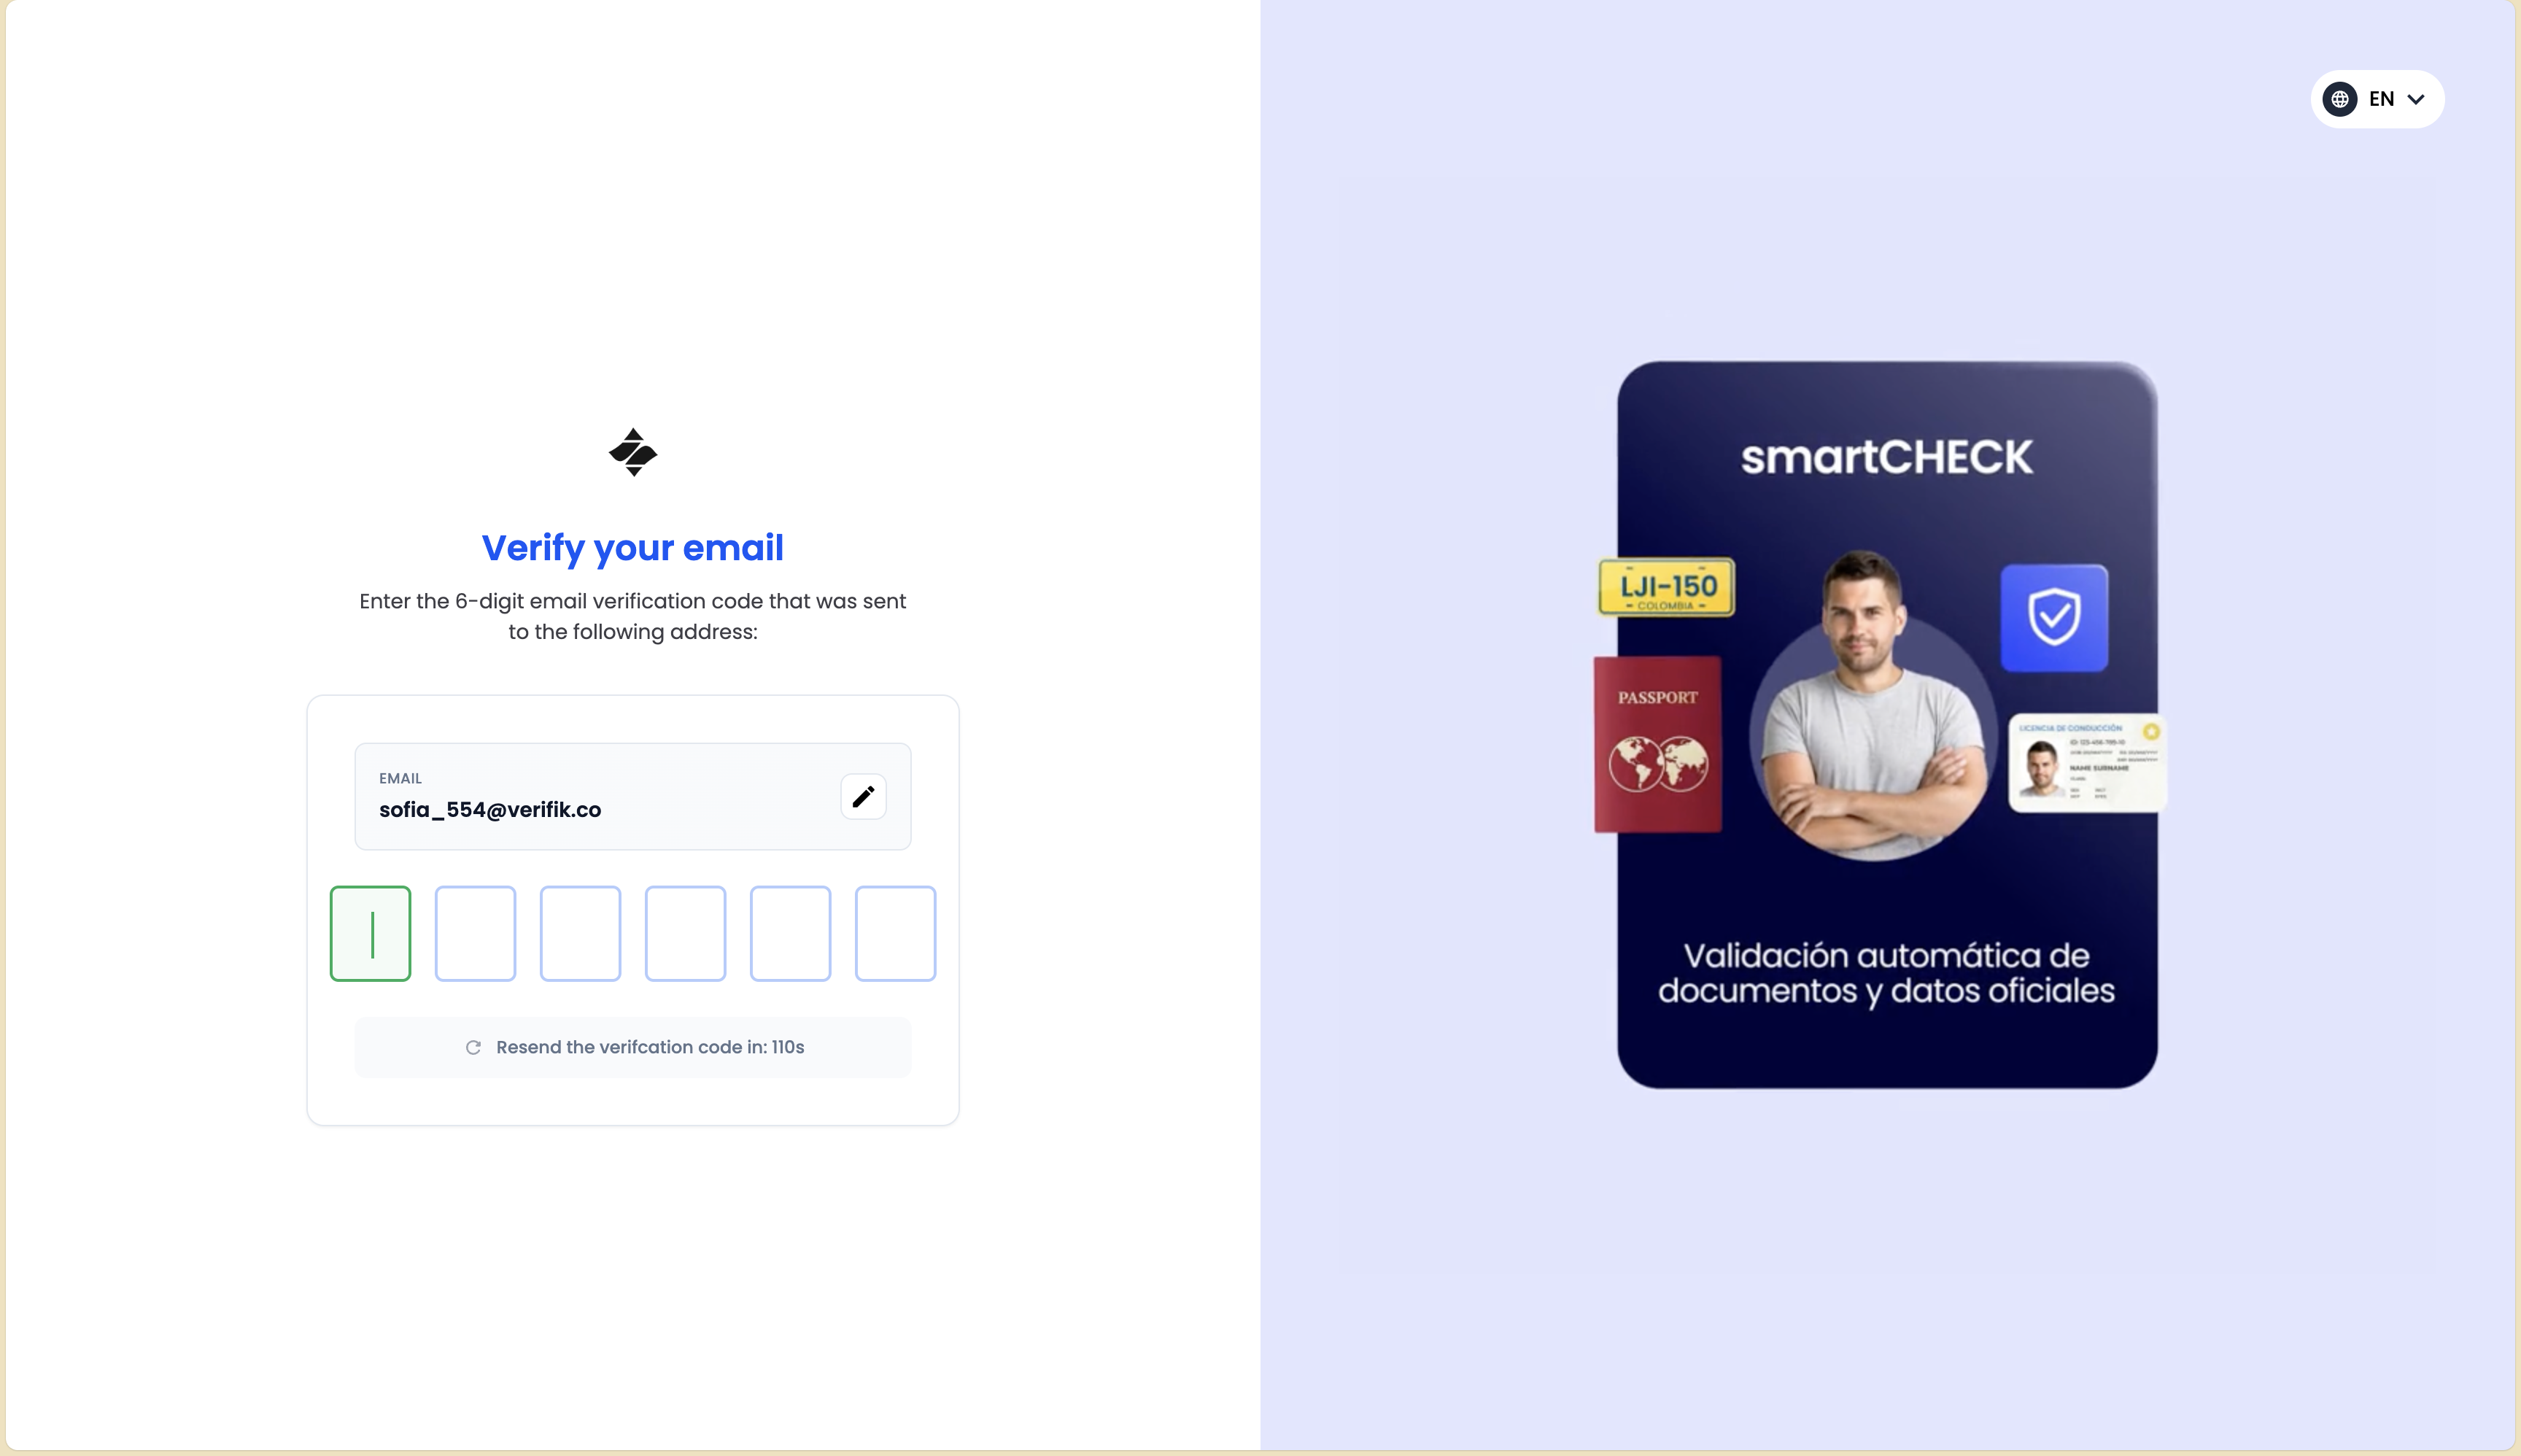
After account registration, users must verify their email address to ensure it's valid and accessible.
Email Verification Process
-
Verification Code Sent: A one-time password (OTP) code is automatically sent to the email address provided during registration.
-
Enter Verification Code: Users are prompted to enter the 6-digit verification code received in their email inbox.
-
Code Validation:
- The code is typically valid for a limited time (usually 5-10 minutes)
- Users can request a new code if the current one expires
- Multiple attempts may be allowed, but excessive failed attempts may temporarily lock the account
-
Resend Code: If the code hasn't arrived or has expired, users can click "Resend Code" to receive a new verification code.
Check your spam or junk folder if you don't receive the verification email within a few minutes.
Once the email is verified, users proceed to phone verification.
Step 3: Phone Verification
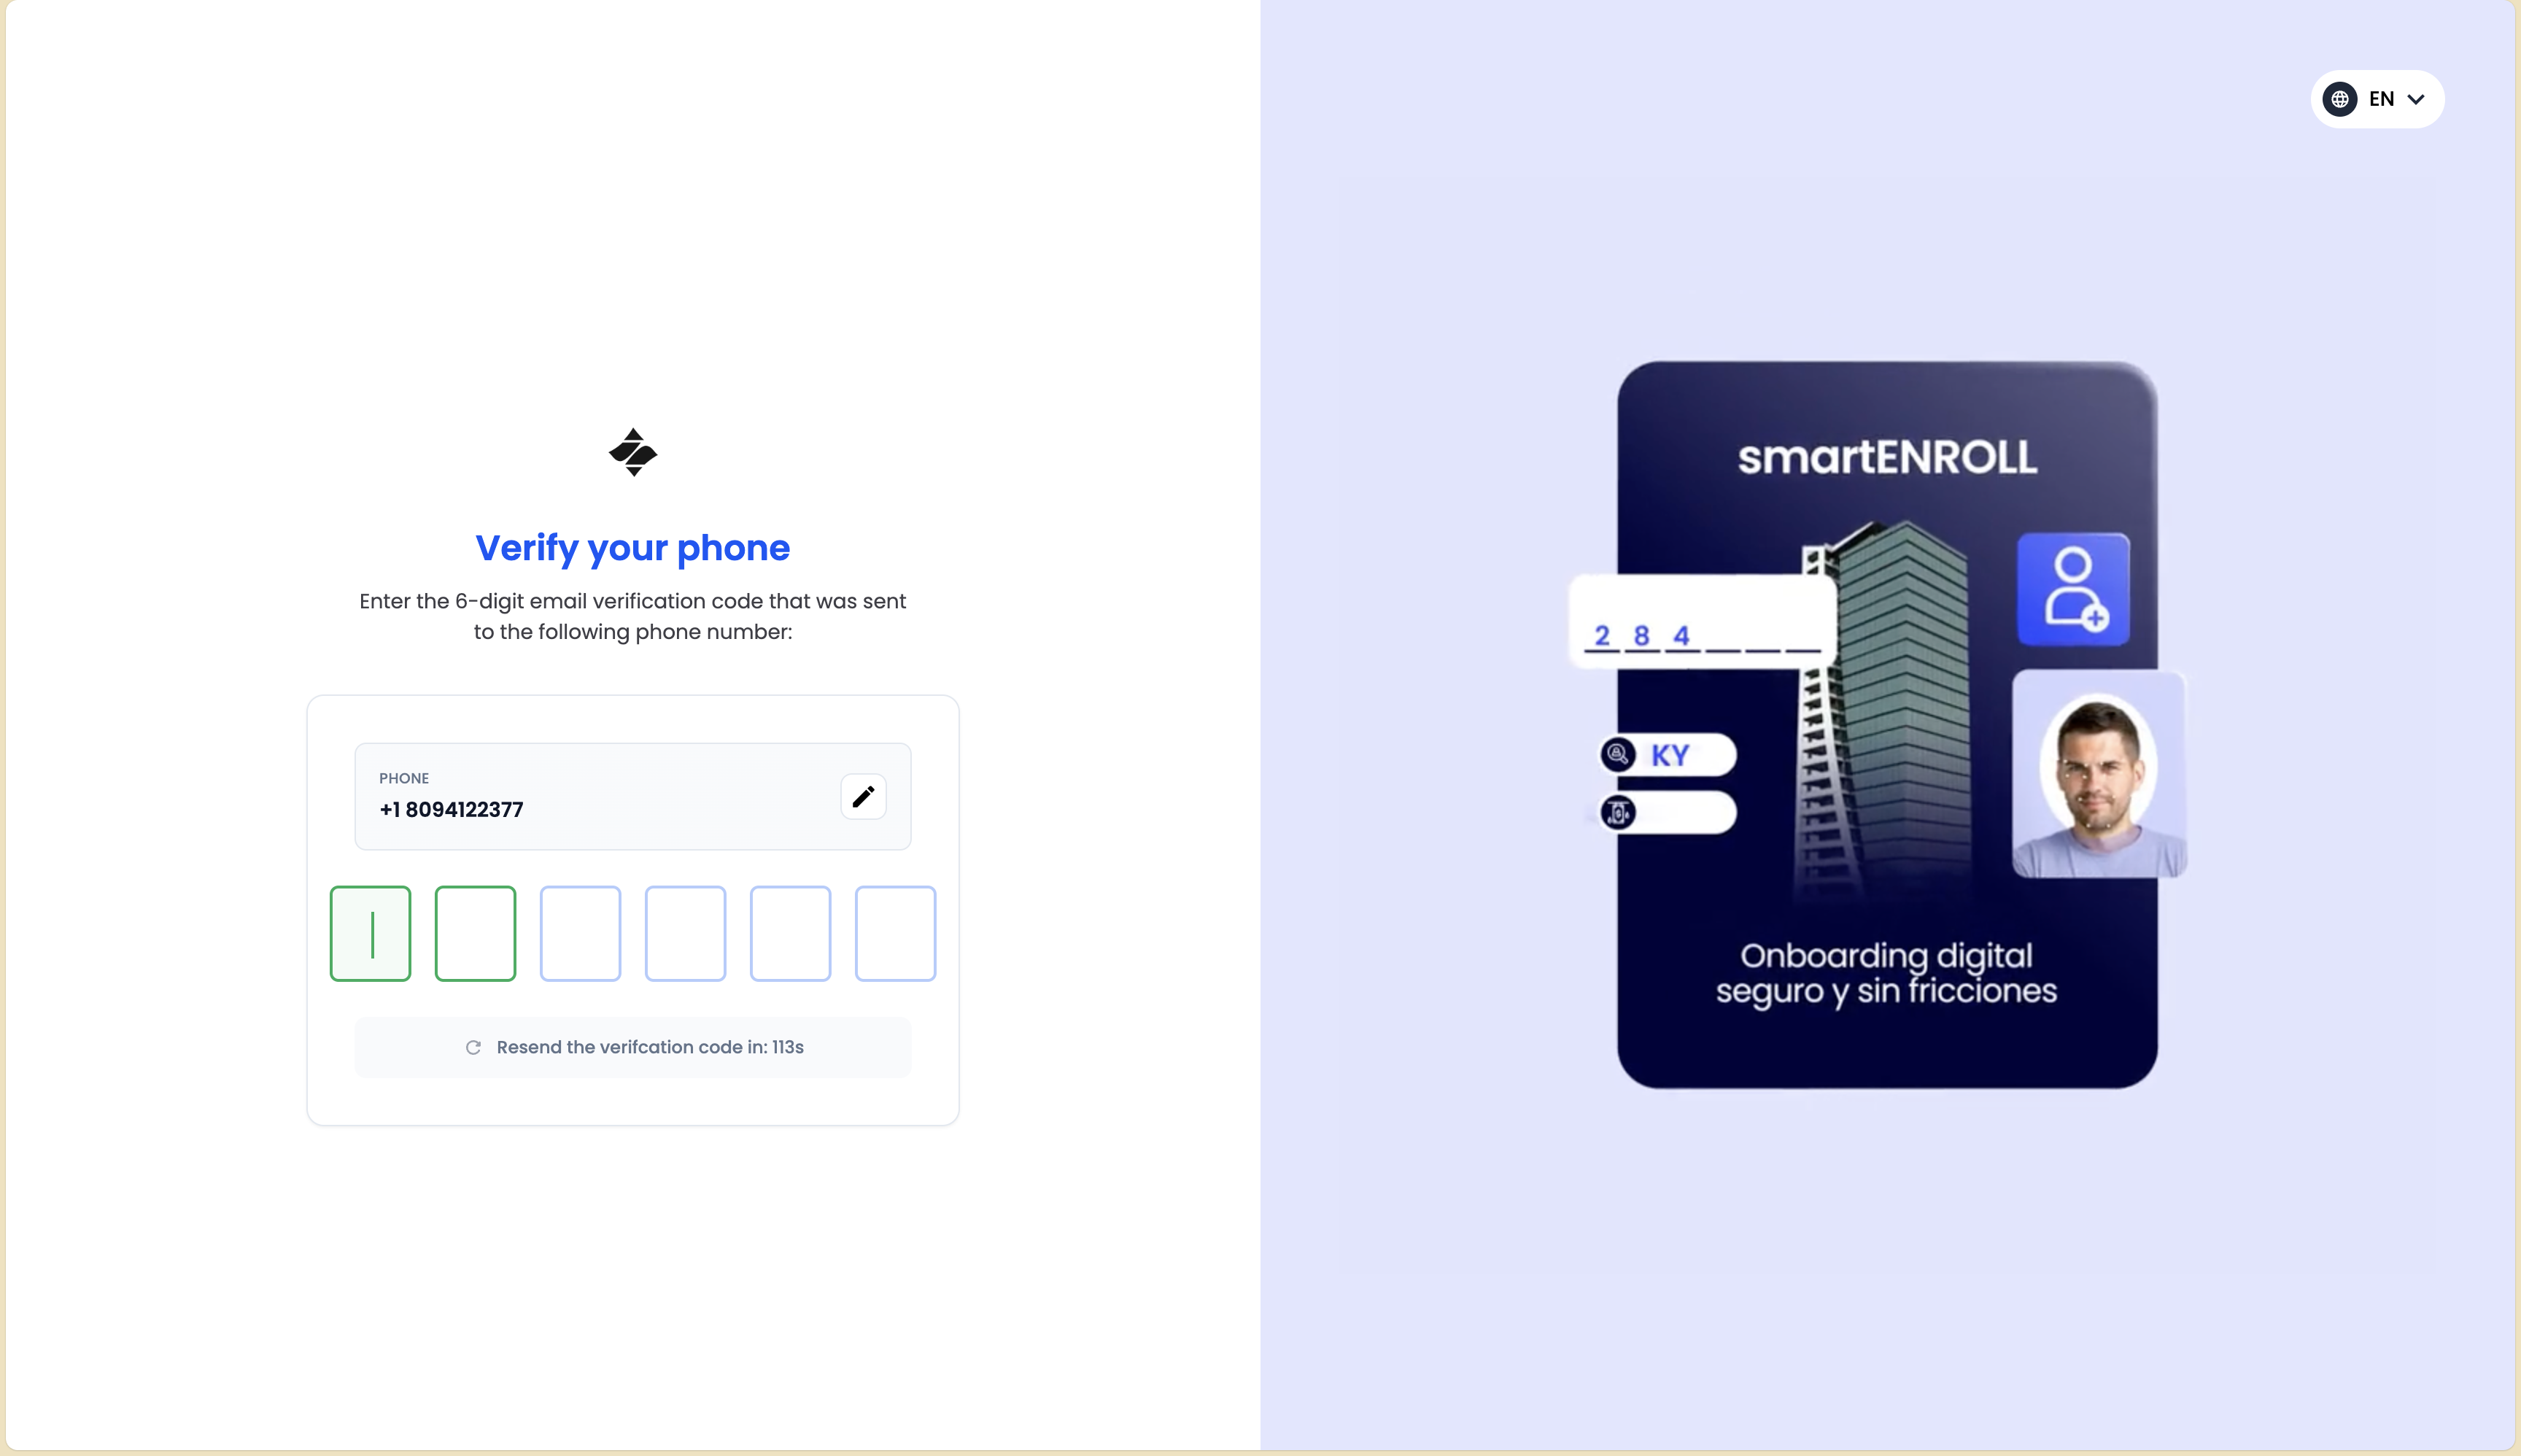
Phone verification ensures that the user has access to the phone number they provided and adds an additional layer of security.
Phone Verification Methods
The verification method depends on the organization's configuration:
- SMS Verification: A verification code is sent via SMS to the provided phone number
- WhatsApp Verification: A verification code is sent via WhatsApp (if enabled)
- Both Methods: Users may have the option to choose between SMS or WhatsApp
Phone Verification Process
-
Select Verification Method: If multiple methods are available, users select their preferred option (SMS or WhatsApp).
-
Code Sent: A verification code is sent to the selected phone number.
-
Enter Verification Code: Users enter the code received on their phone.
-
Resend Code: Similar to email verification, users can request a new code if needed.
Ensure your phone has good network connectivity and can receive SMS or WhatsApp messages before starting this step.
After successful phone verification, users proceed to the KYC instructions screen.
Step 4: KYC Instructions

Before beginning the document and biometric verification process, users are presented with clear instructions on what to expect and how to prepare.
What Users Need to Know
The instructions screen typically includes:
- Required Documents: Information about which identity documents are acceptable (e.g., Government ID, Passport, Driving License)
- Document Requirements:
- Documents must be valid and not expired
- Documents must be clear and legible
- Both front and back sides may be required
- Biometric Requirements:
- Users will need to take a selfie for facial recognition
- Good lighting is recommended
- Face must be clearly visible
- Process Duration: Estimated time to complete the verification
- Privacy Assurance: Information about how their data is protected
Optional: Skip Instructions
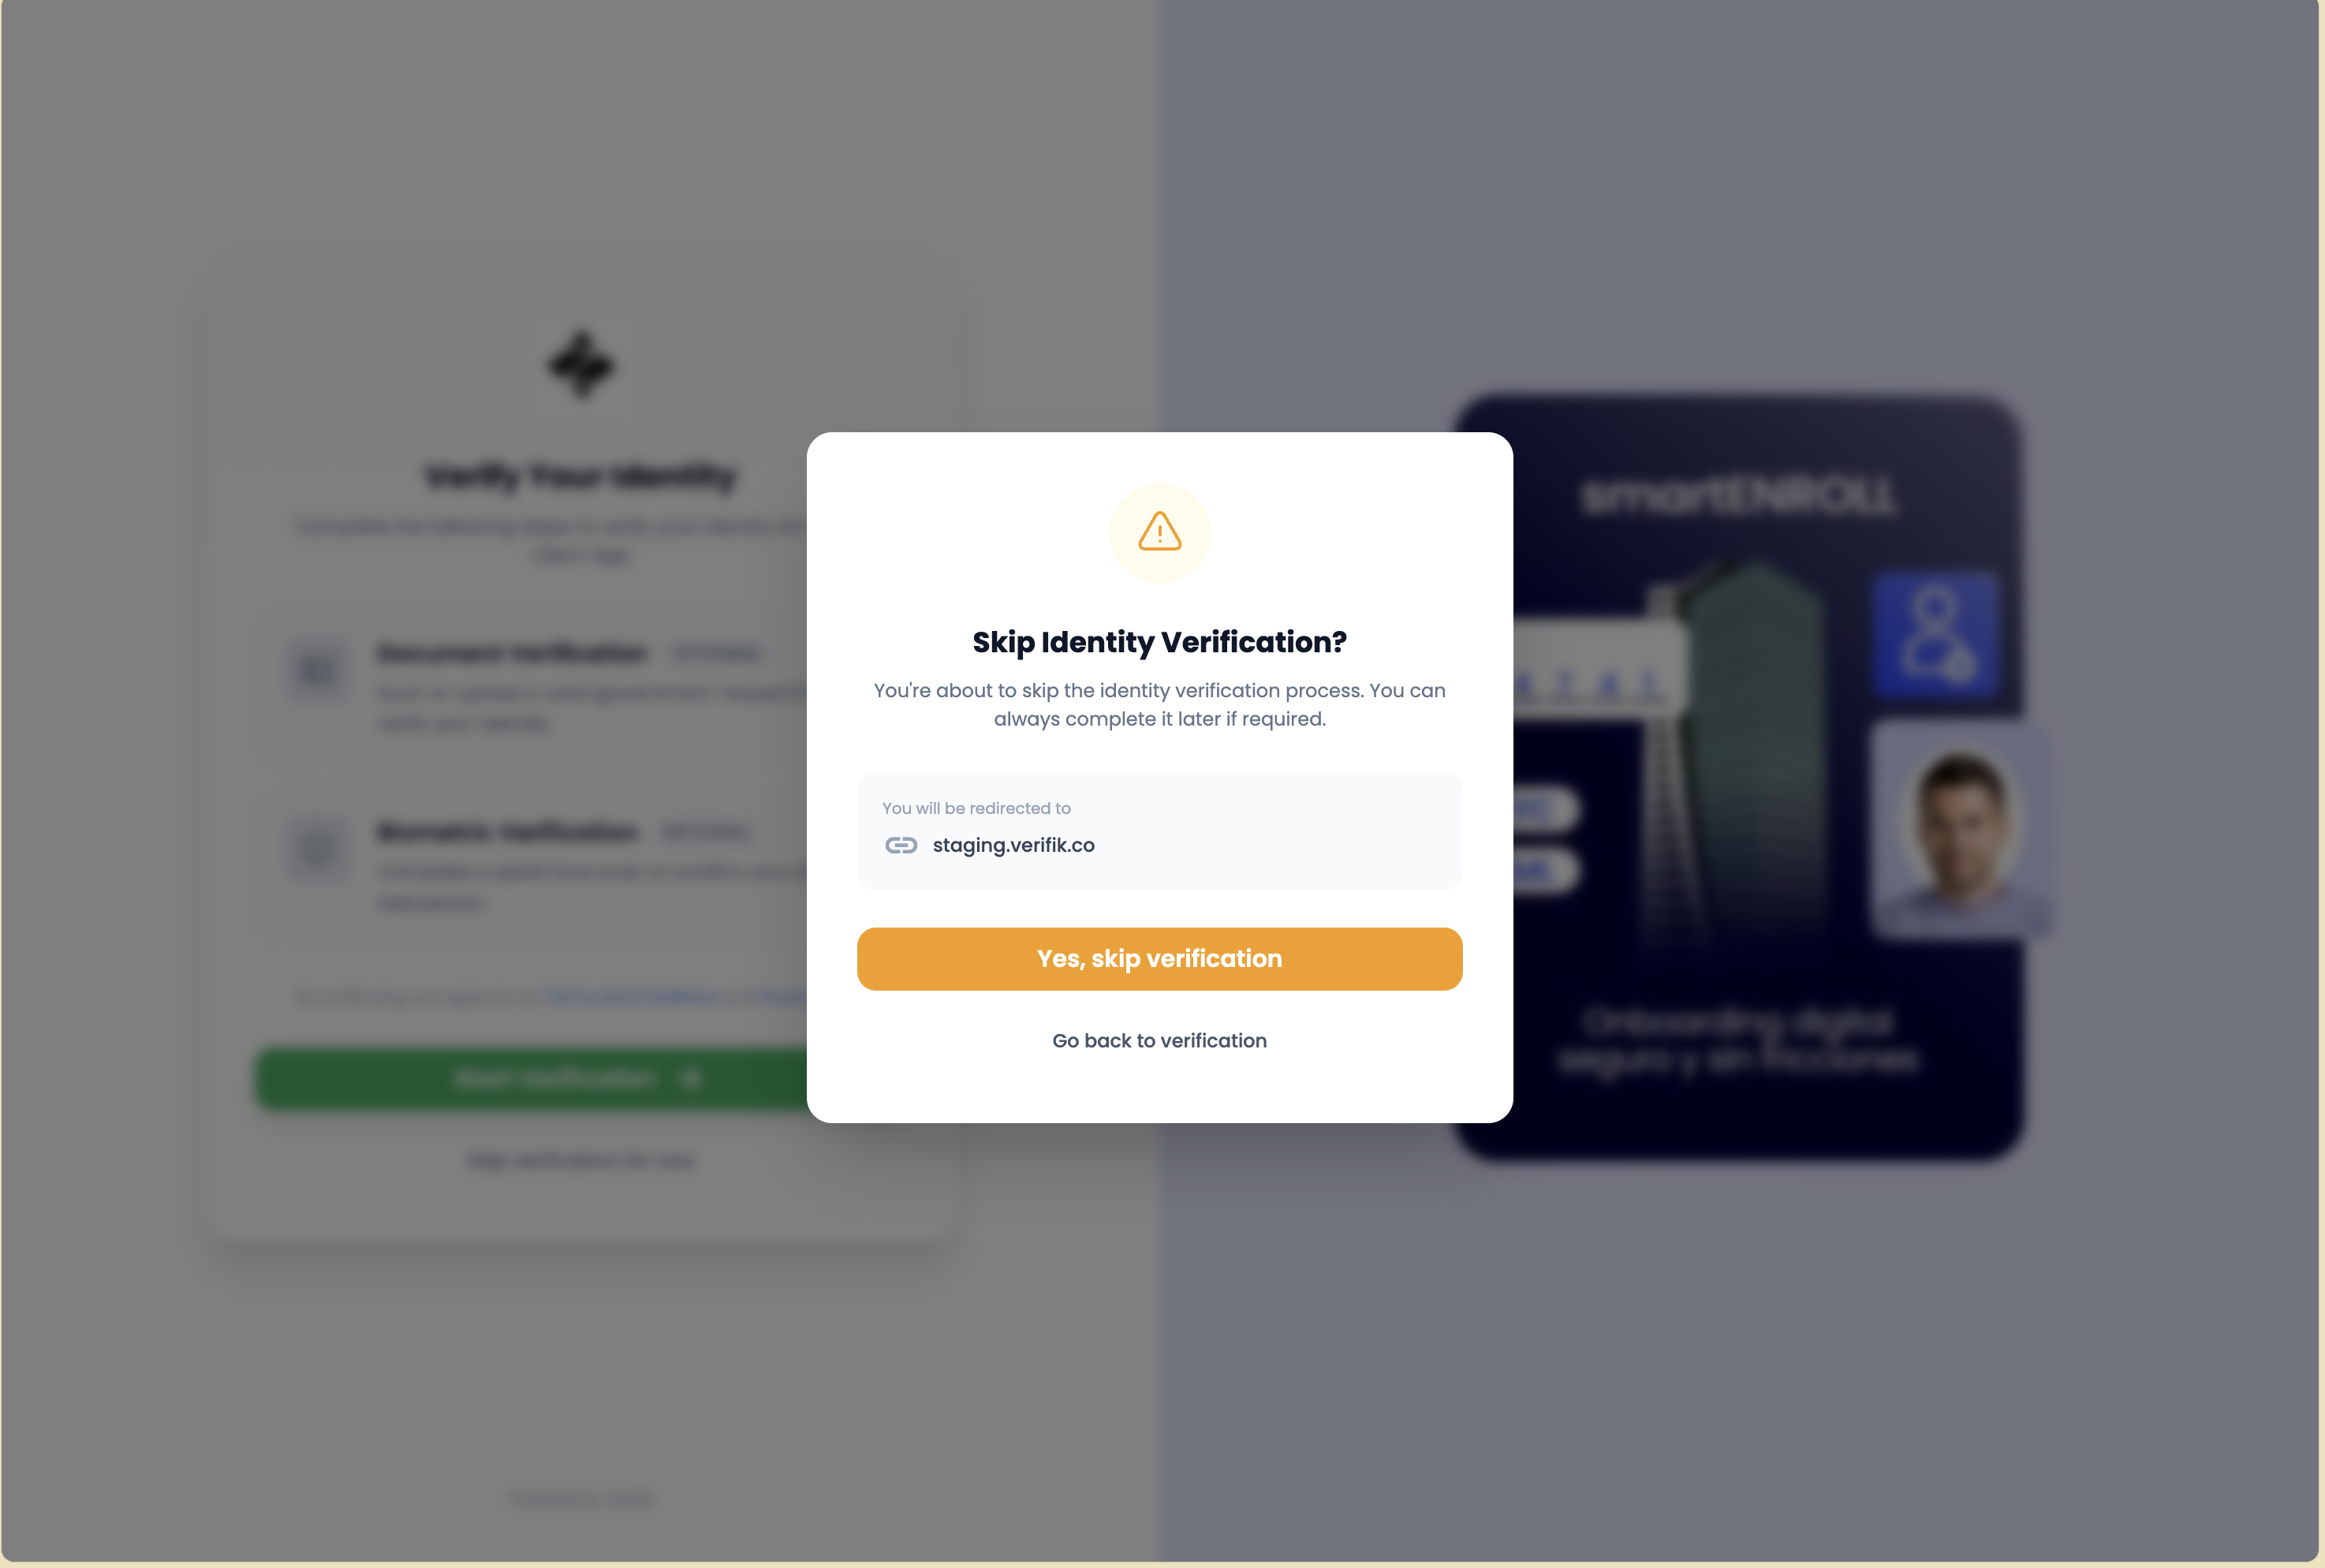
Some implementations may allow users to skip the instructions if they're already familiar with the process. However, it's recommended to review the instructions for first-time users.
Take a moment to read the instructions carefully. Being prepared will help you complete the verification faster and avoid common mistakes.
Once users are ready, they proceed to document selection.
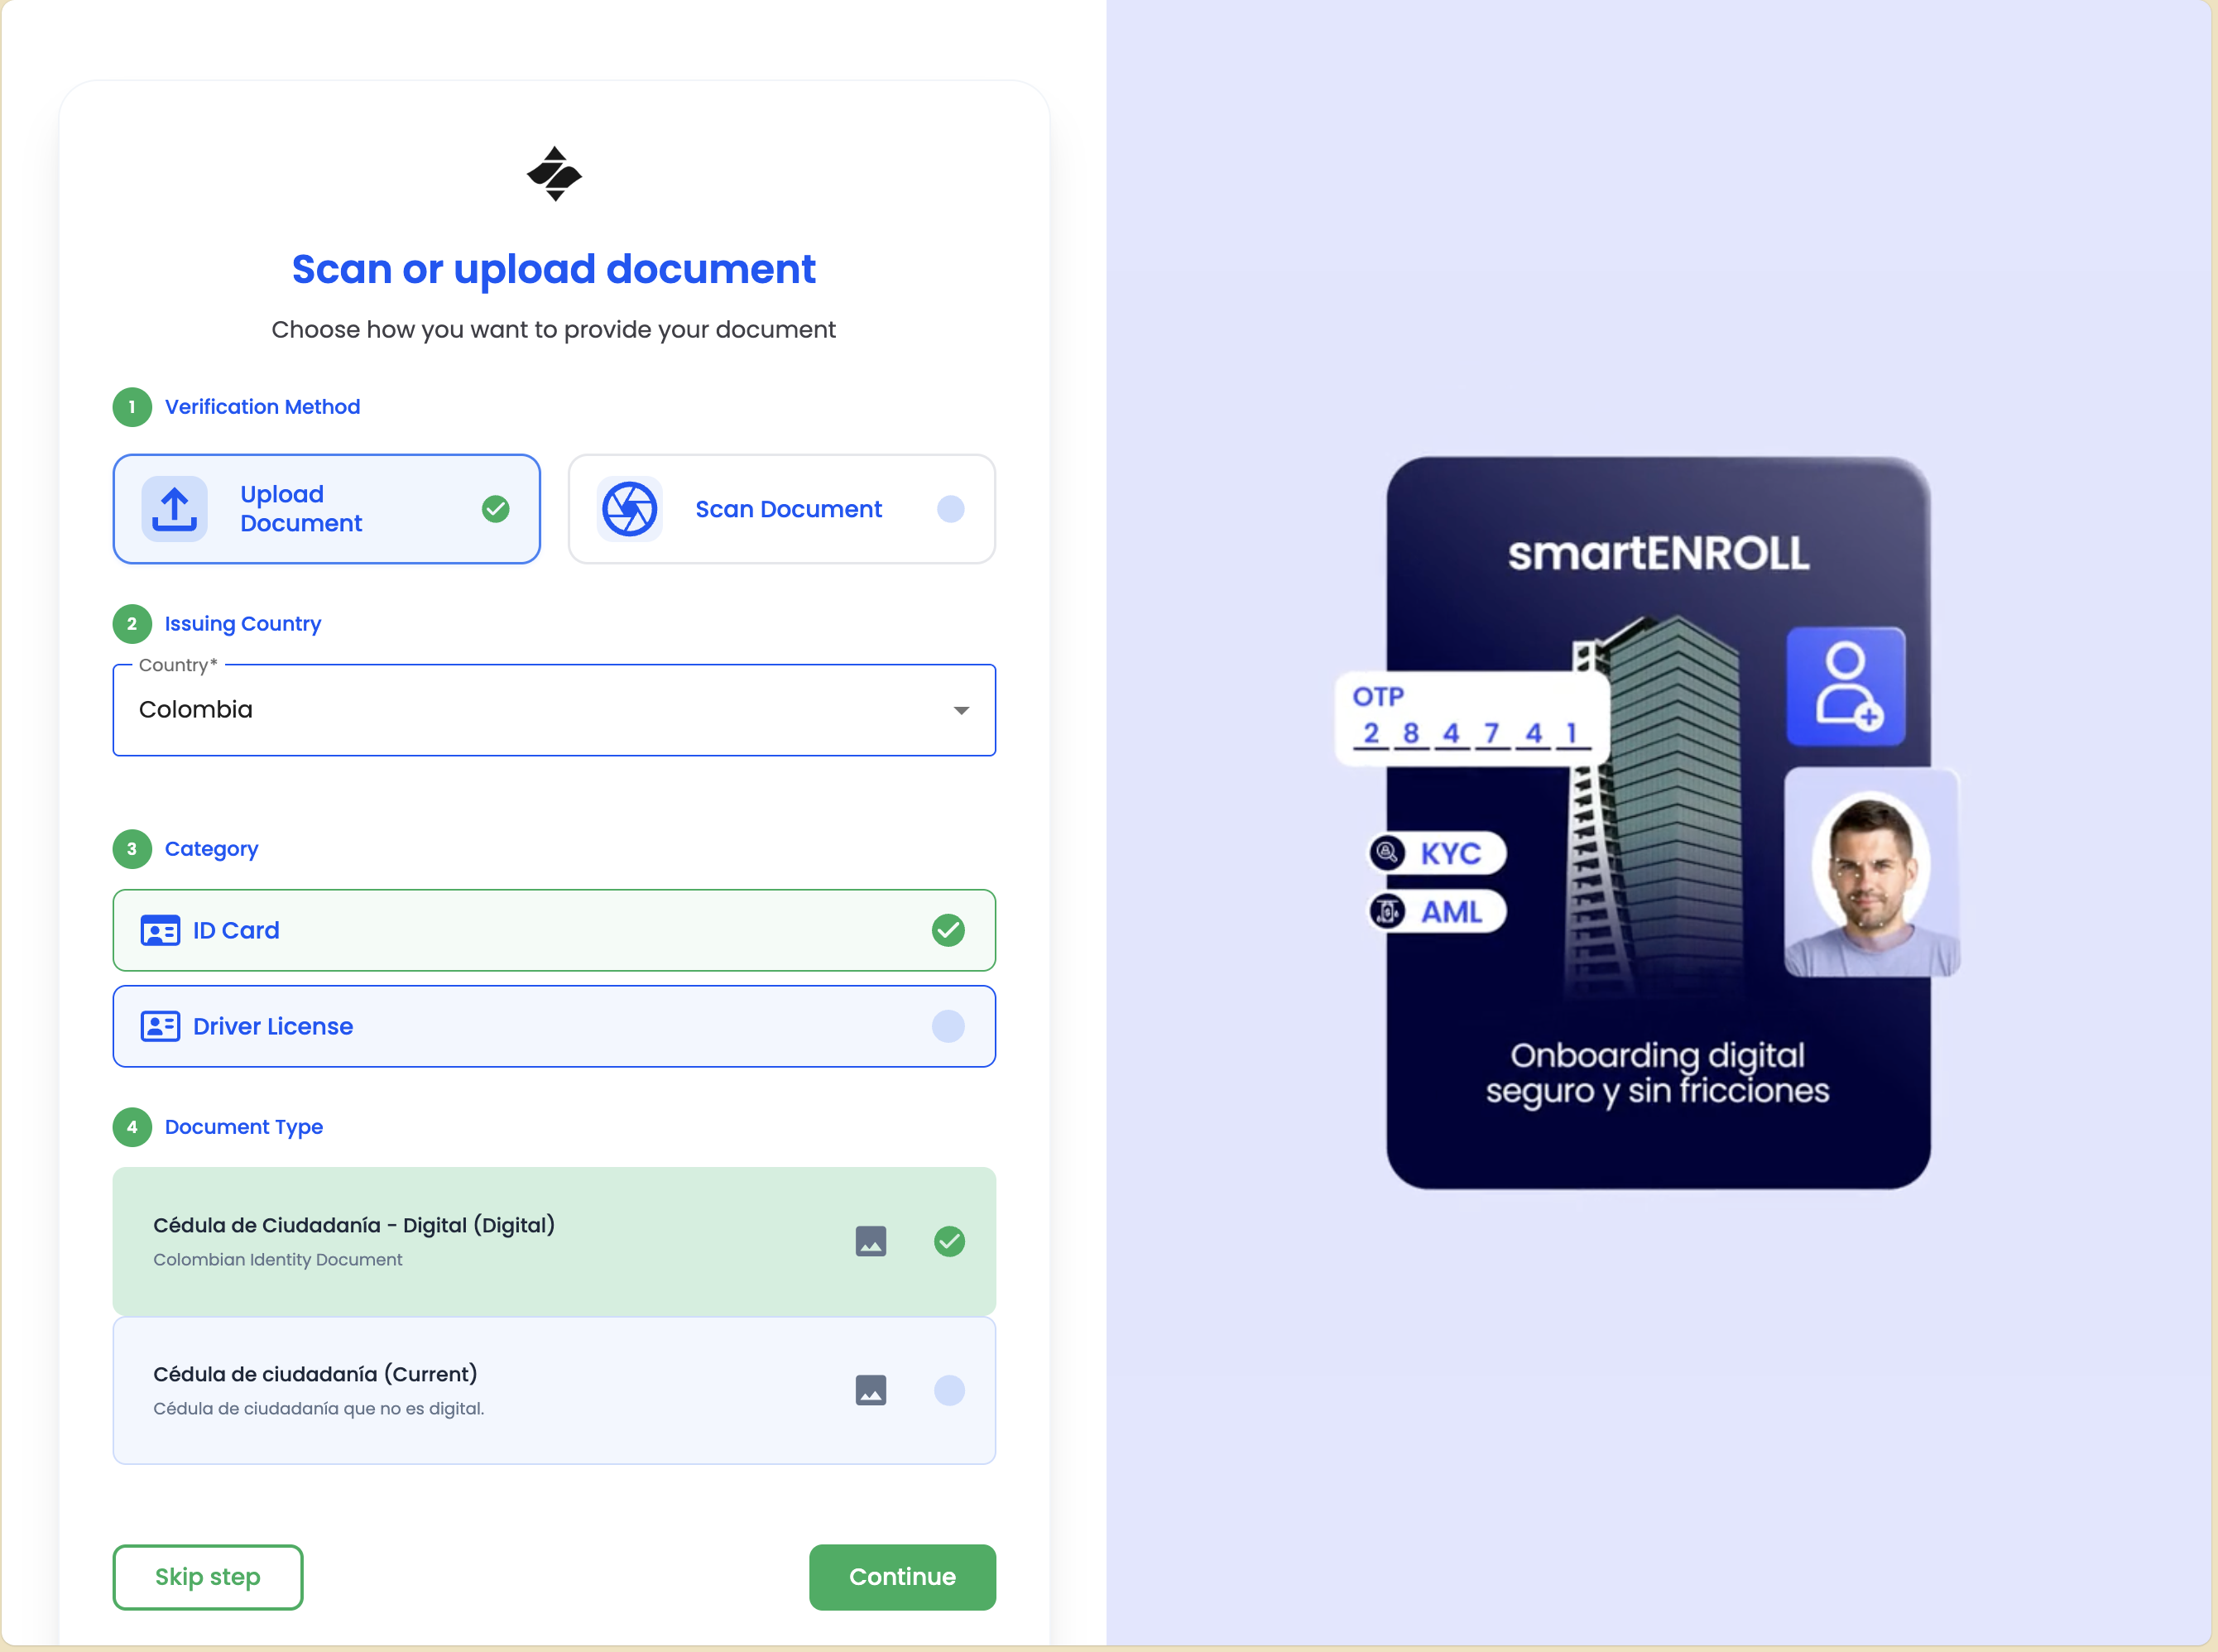
Step 5: Document Selection
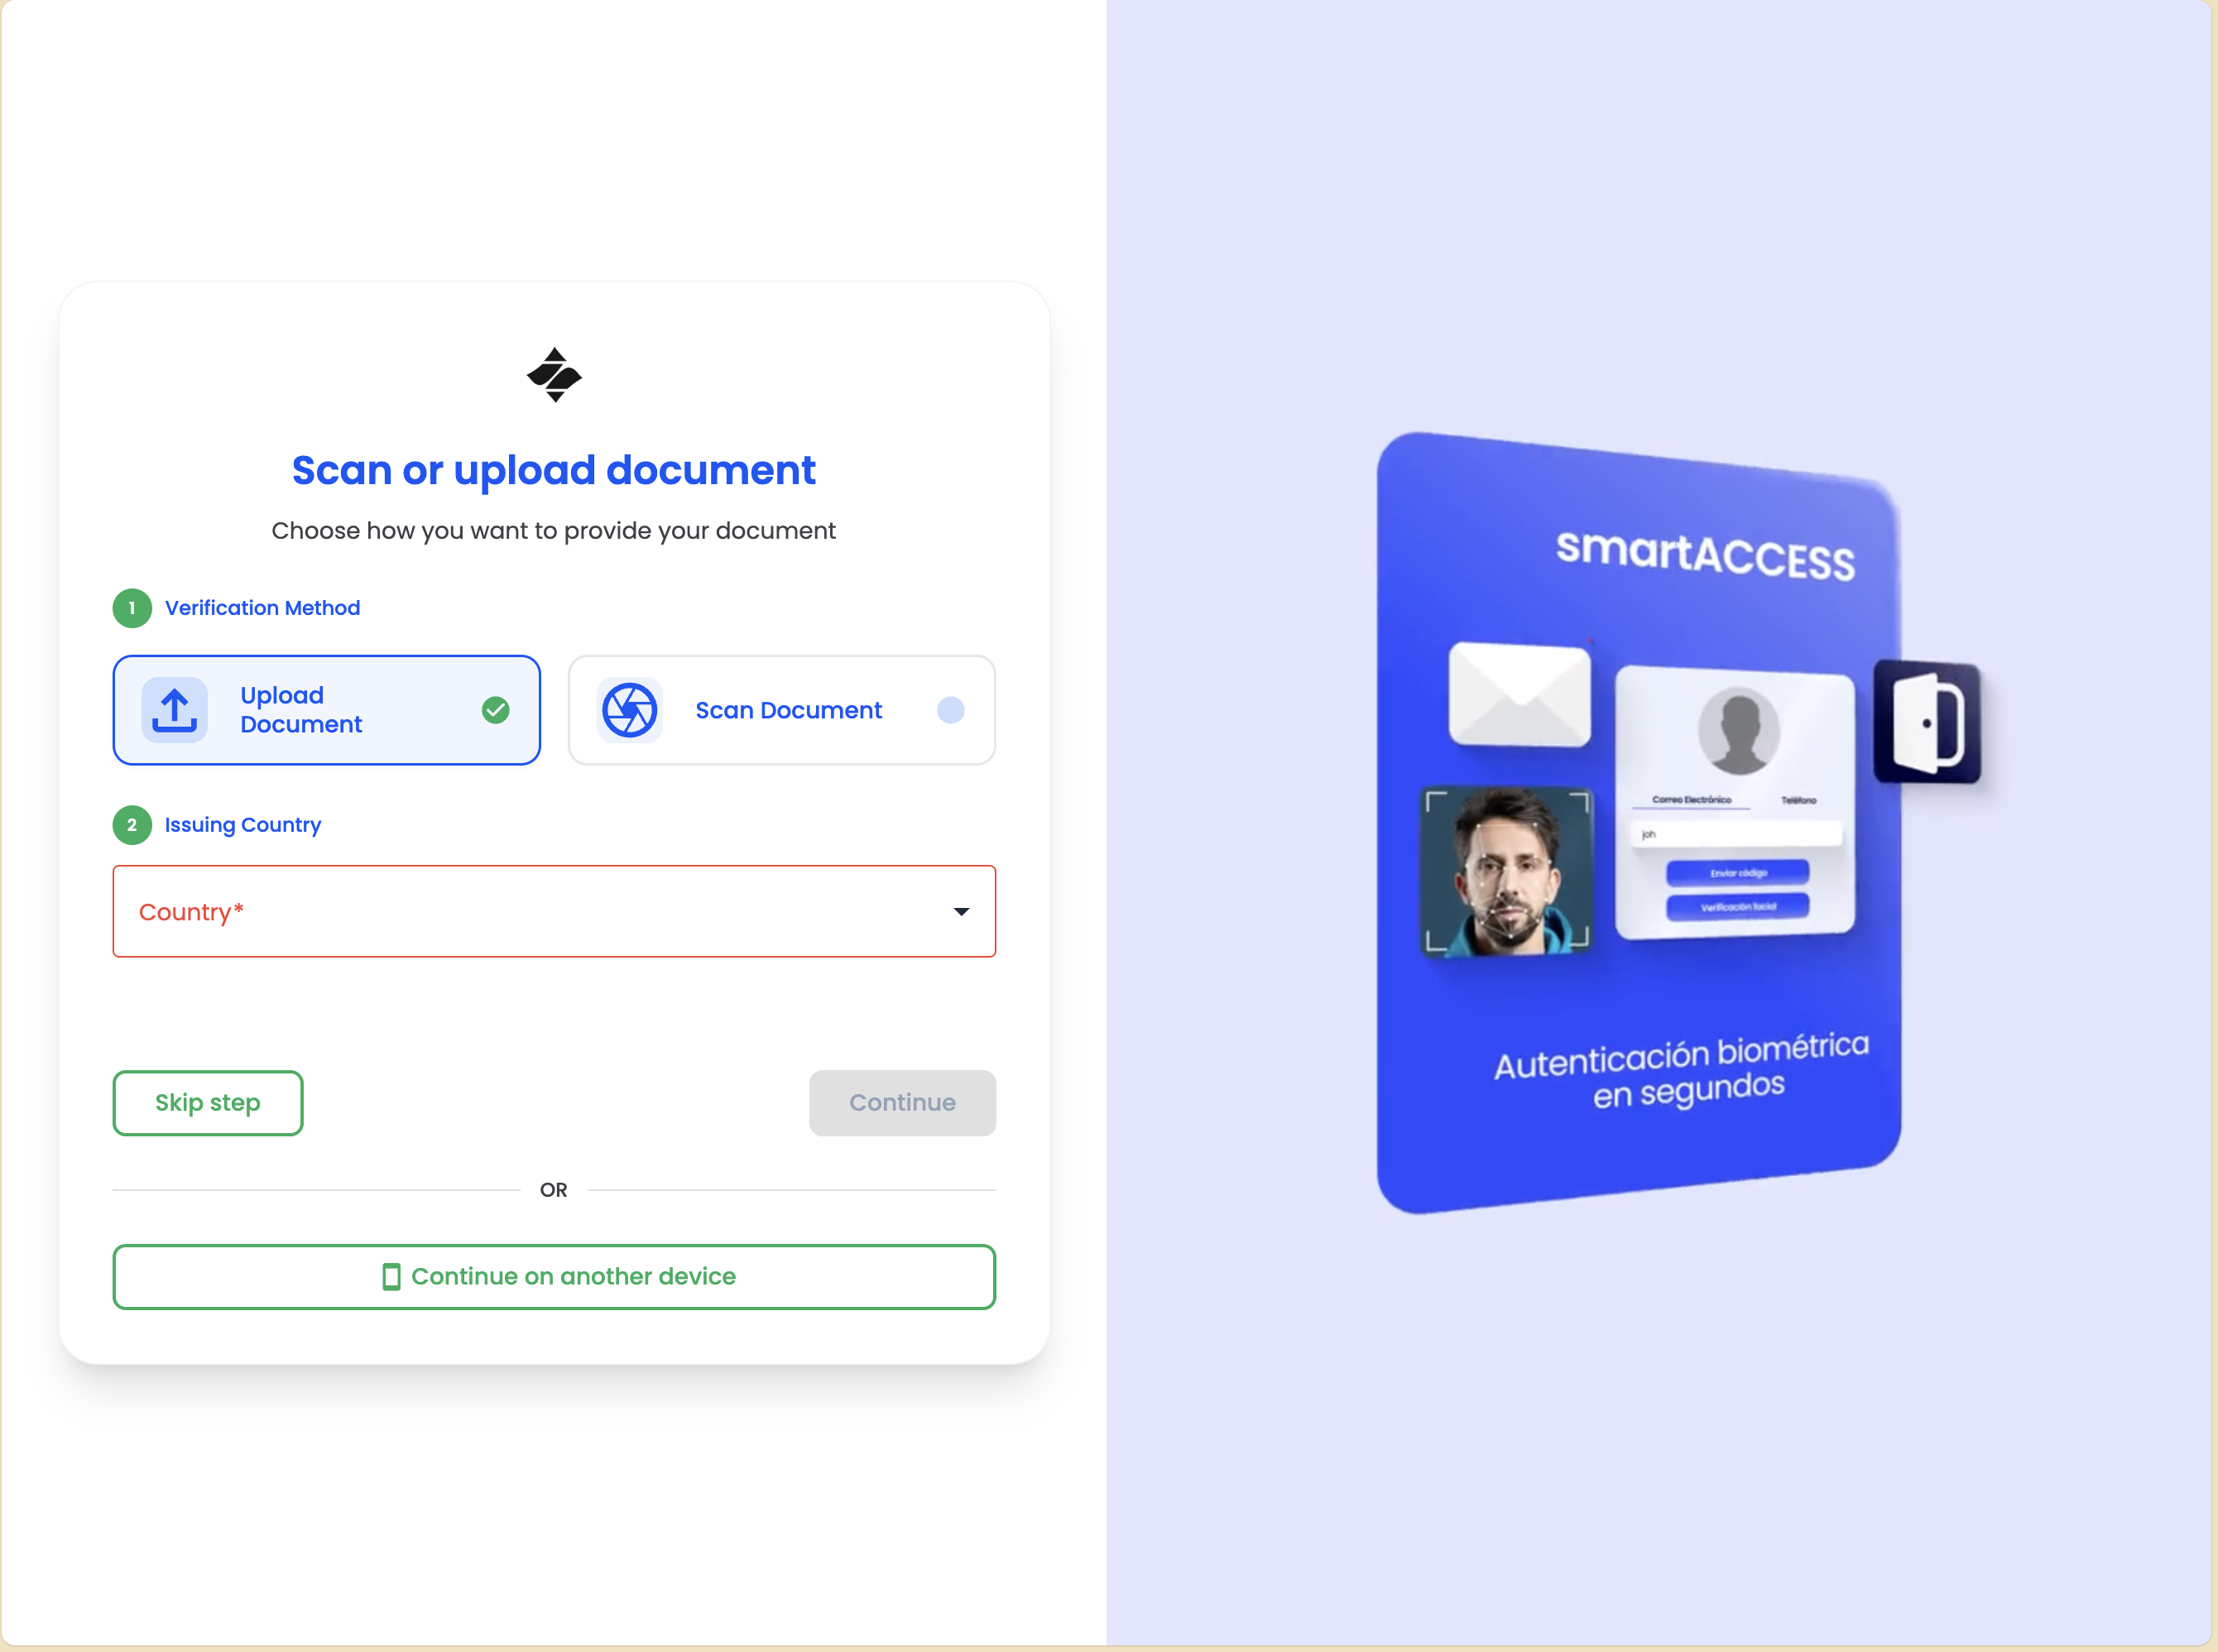
Users must select the type of identity document they will use for verification. The available options depend on the organization's configuration and the user's country.
Available Document Types
Common document types include:
- Government Identity Document: National ID card, citizenship card, or similar government-issued identification
- Passport: Valid passport from the user's country
- Driving License: Valid driver's license
Document Selection Process
-
View Options: Users see a list or grid of available document types with icons or images representing each option.
-
Select Document Type: Users tap or click on their preferred document type.
-
Confirmation: After selection, the system confirms the chosen document type and provides specific instructions for that document.
Only select a document type that you have available and that matches the documents accepted by the organization. Using an unsupported document type will result in verification failure.
After selecting the document type, users proceed to document capture.
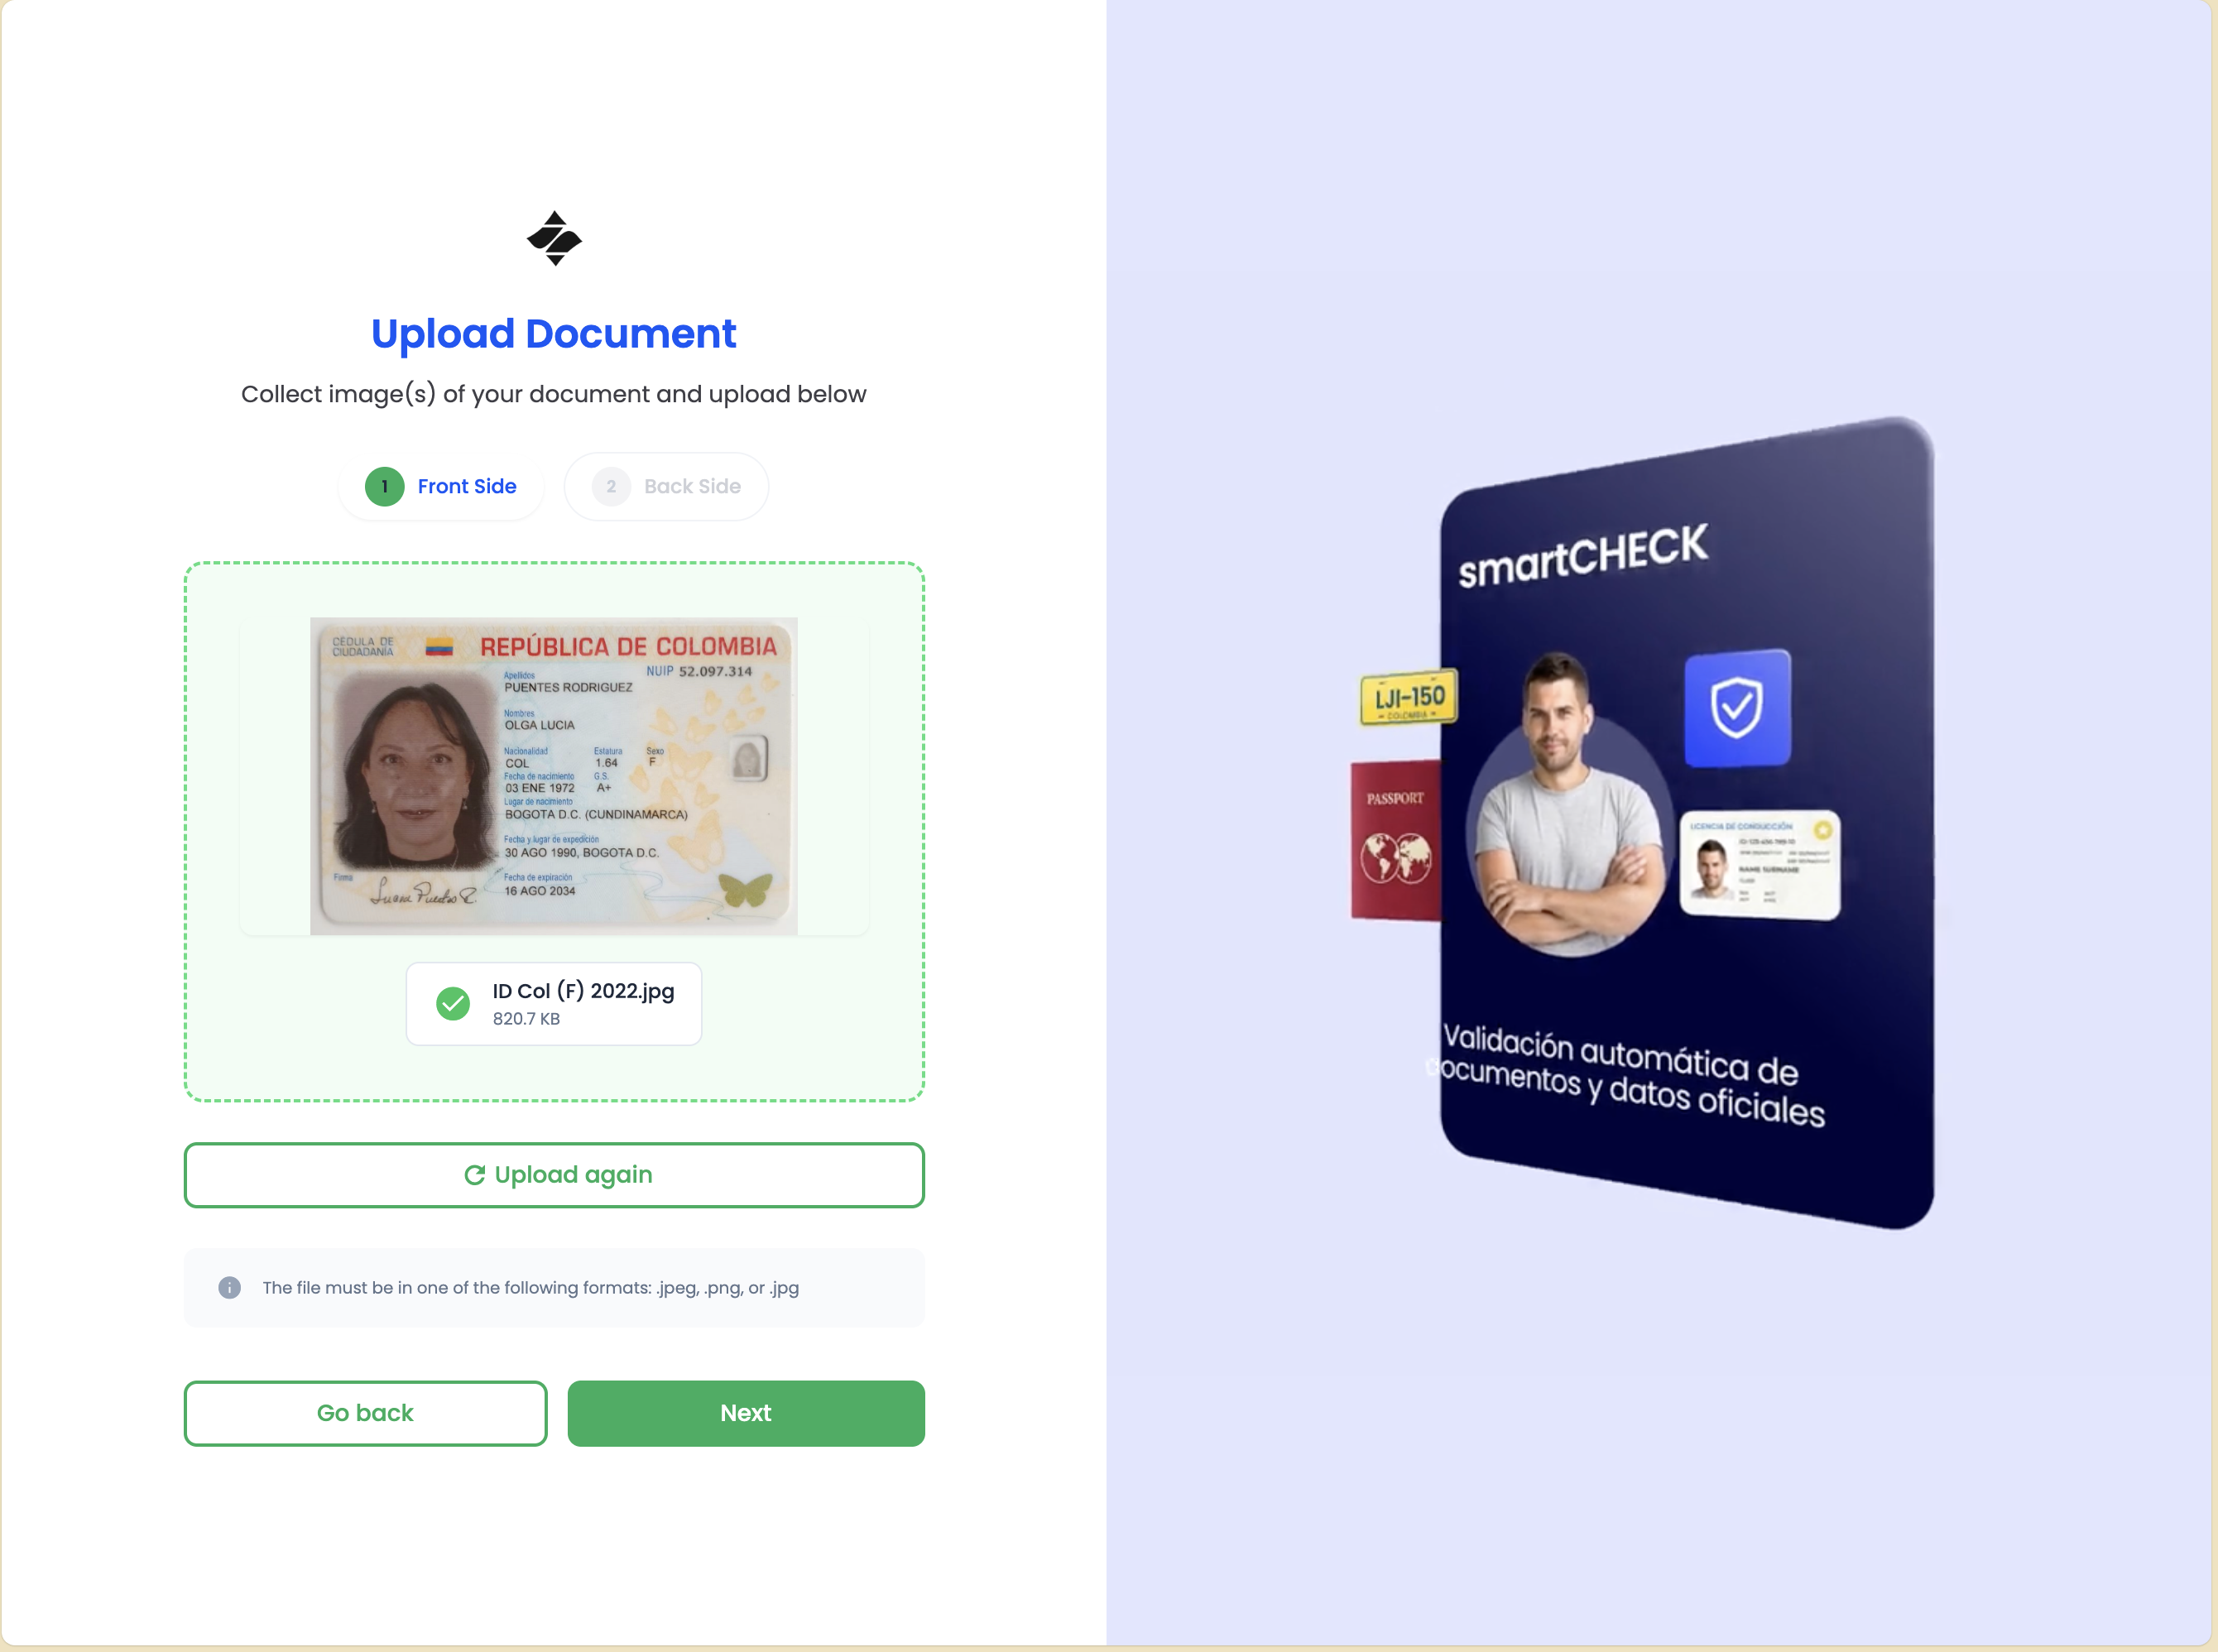
Step 6: Document Upload - Front Side
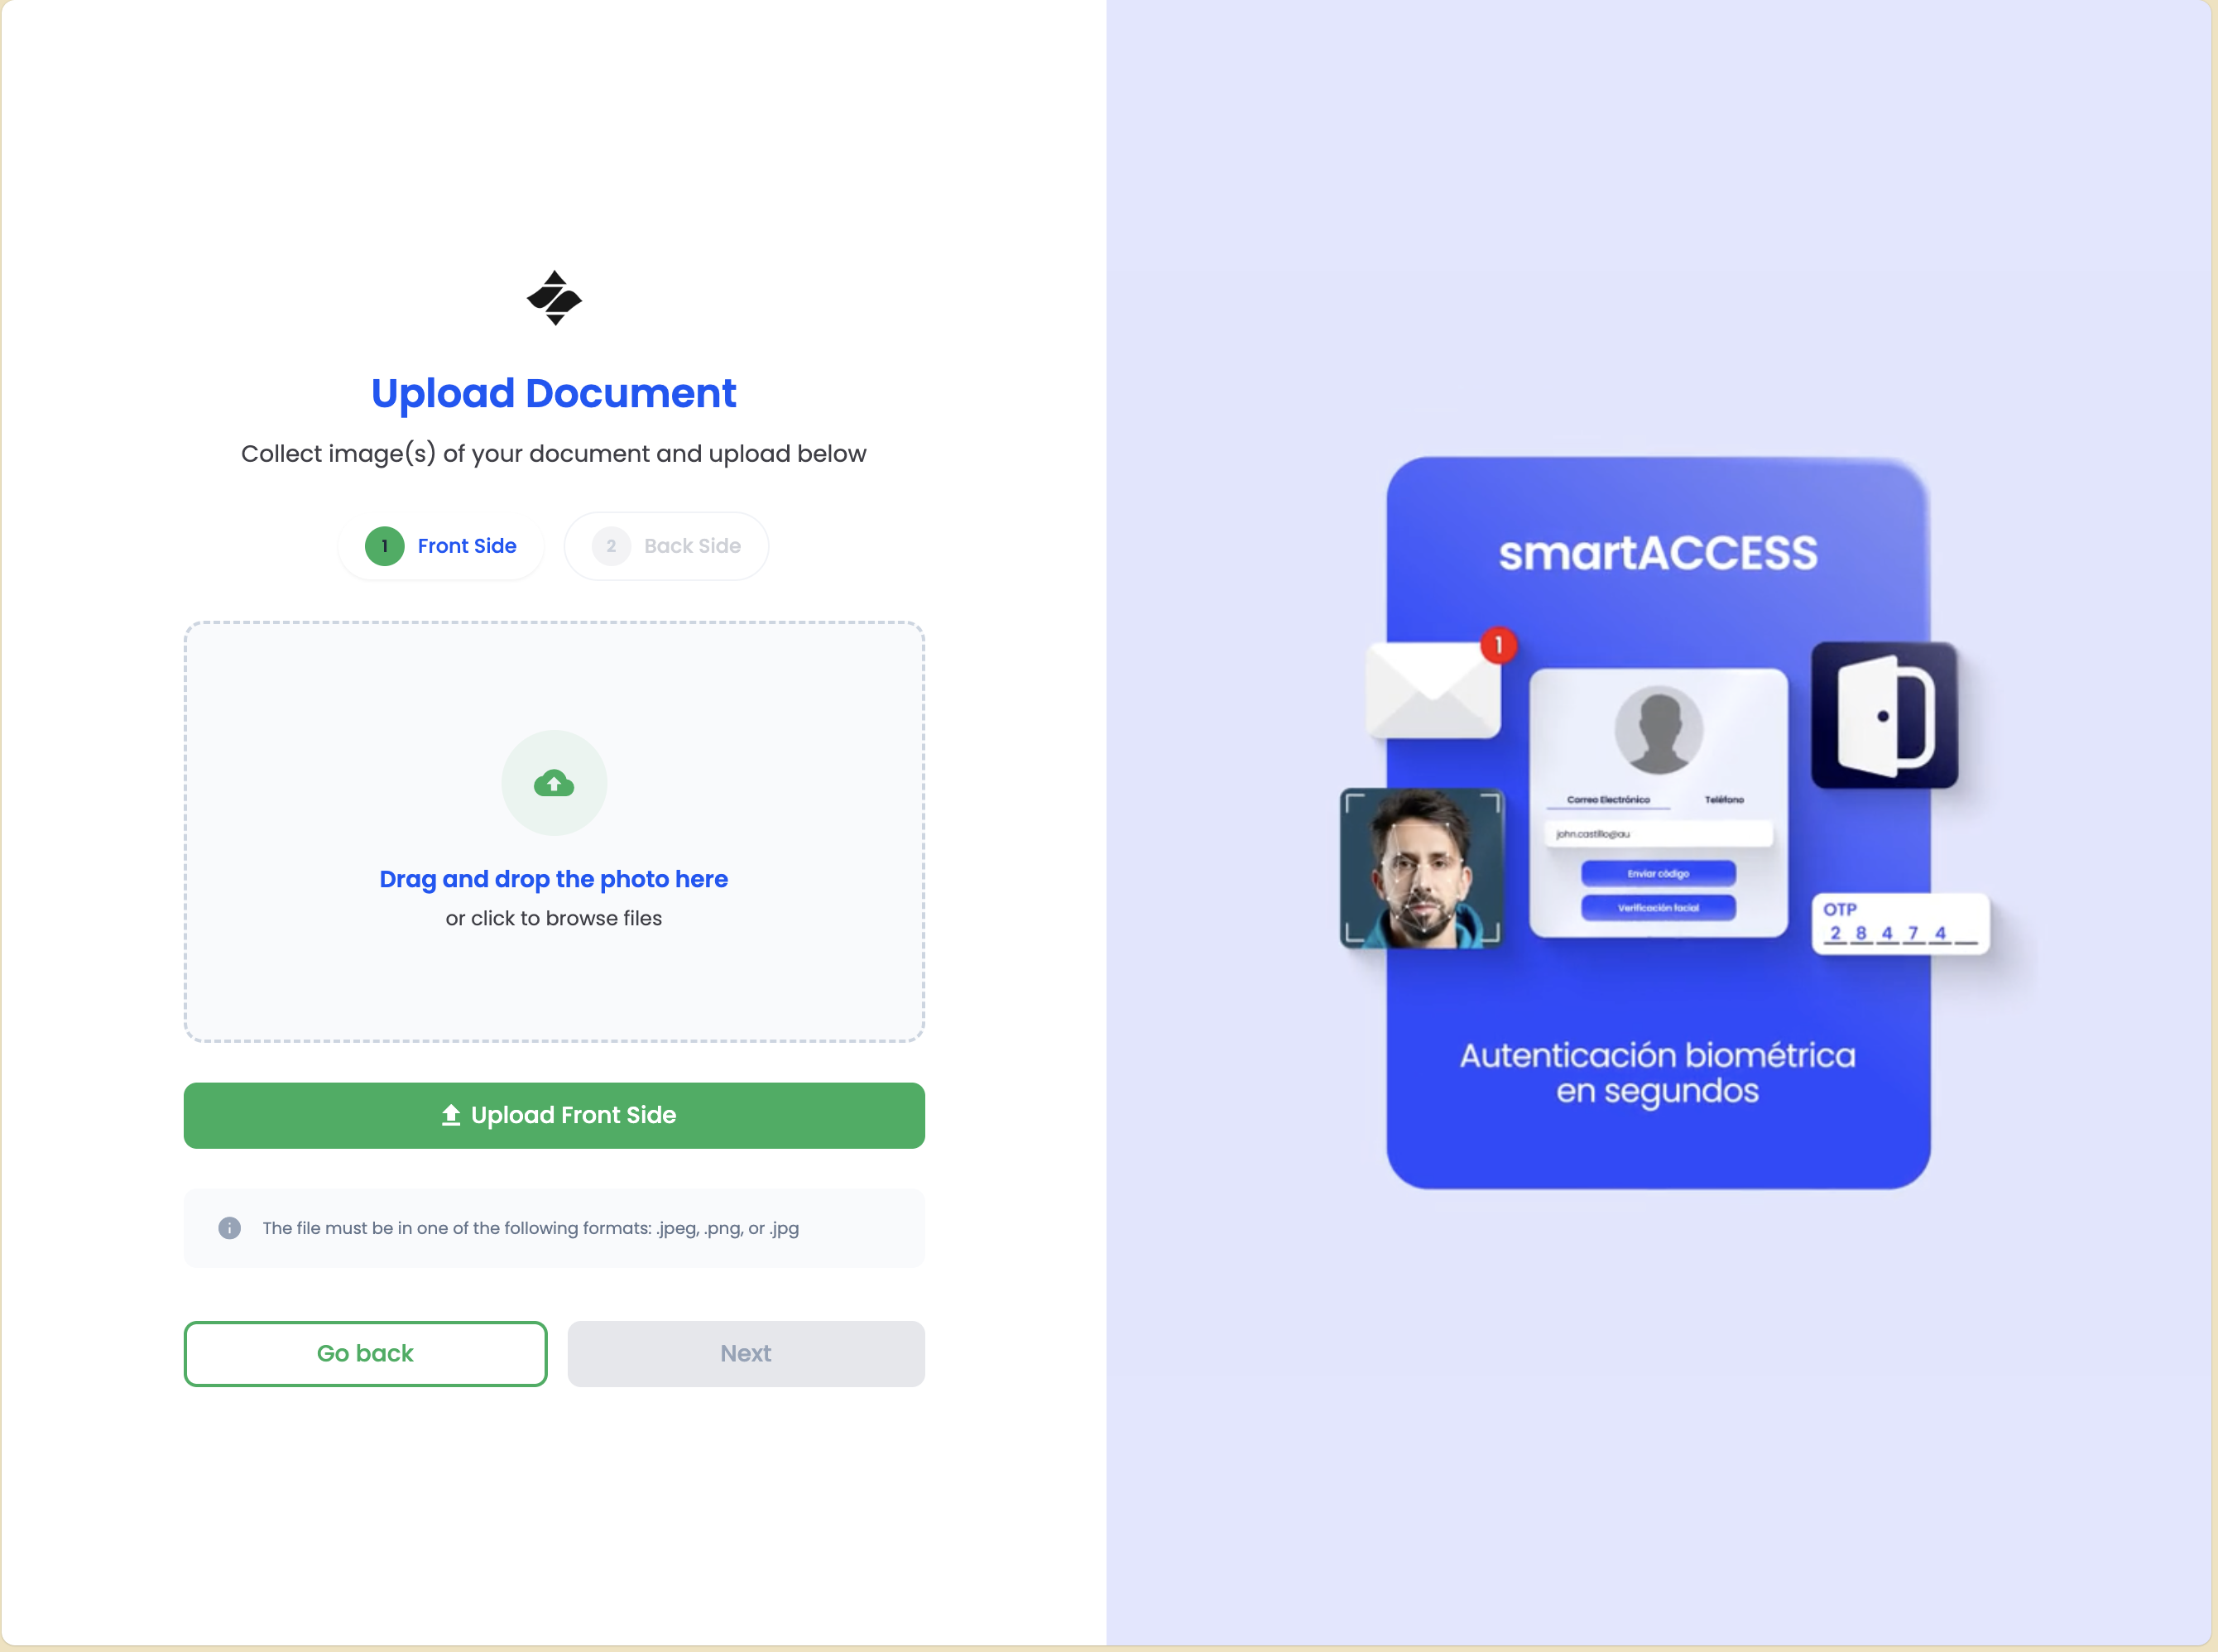
Users have two options for capturing their identity document:
Upload Methods
-
Camera Capture: Use the device's camera to take a photo of the physical document in real-time
- Provides better quality and real-time validation
- Recommended for most users
- May include guidance overlays to help position the document correctly
-
File Upload: Upload a digital copy of the document from the device's storage
- Useful if the document is already digitized
- Must meet quality requirements (clear, readable, not edited)
Document Capture Guidelines
When using the camera:
- Lighting: Ensure good lighting without glare or shadows
- Position: Place the document on a flat, contrasting surface
- Focus: Make sure the document is in focus and all text is readable
- Edges: Capture the entire document within the frame
- No Obstructions: Ensure nothing is covering any part of the document
The system provides real-time feedback during capture:
- Positioning Guides: Visual guides help users align the document correctly
- Quality Check: Automatic quality validation ensures the image meets requirements
- Retry Option: Users can retake the photo if quality is insufficient
After capturing the front side, users see a preview and can:
- Confirm: Proceed if the image is clear and correct
- Retake: Capture a new image if the current one is unsatisfactory
Step 7: Document Upload - Back Side
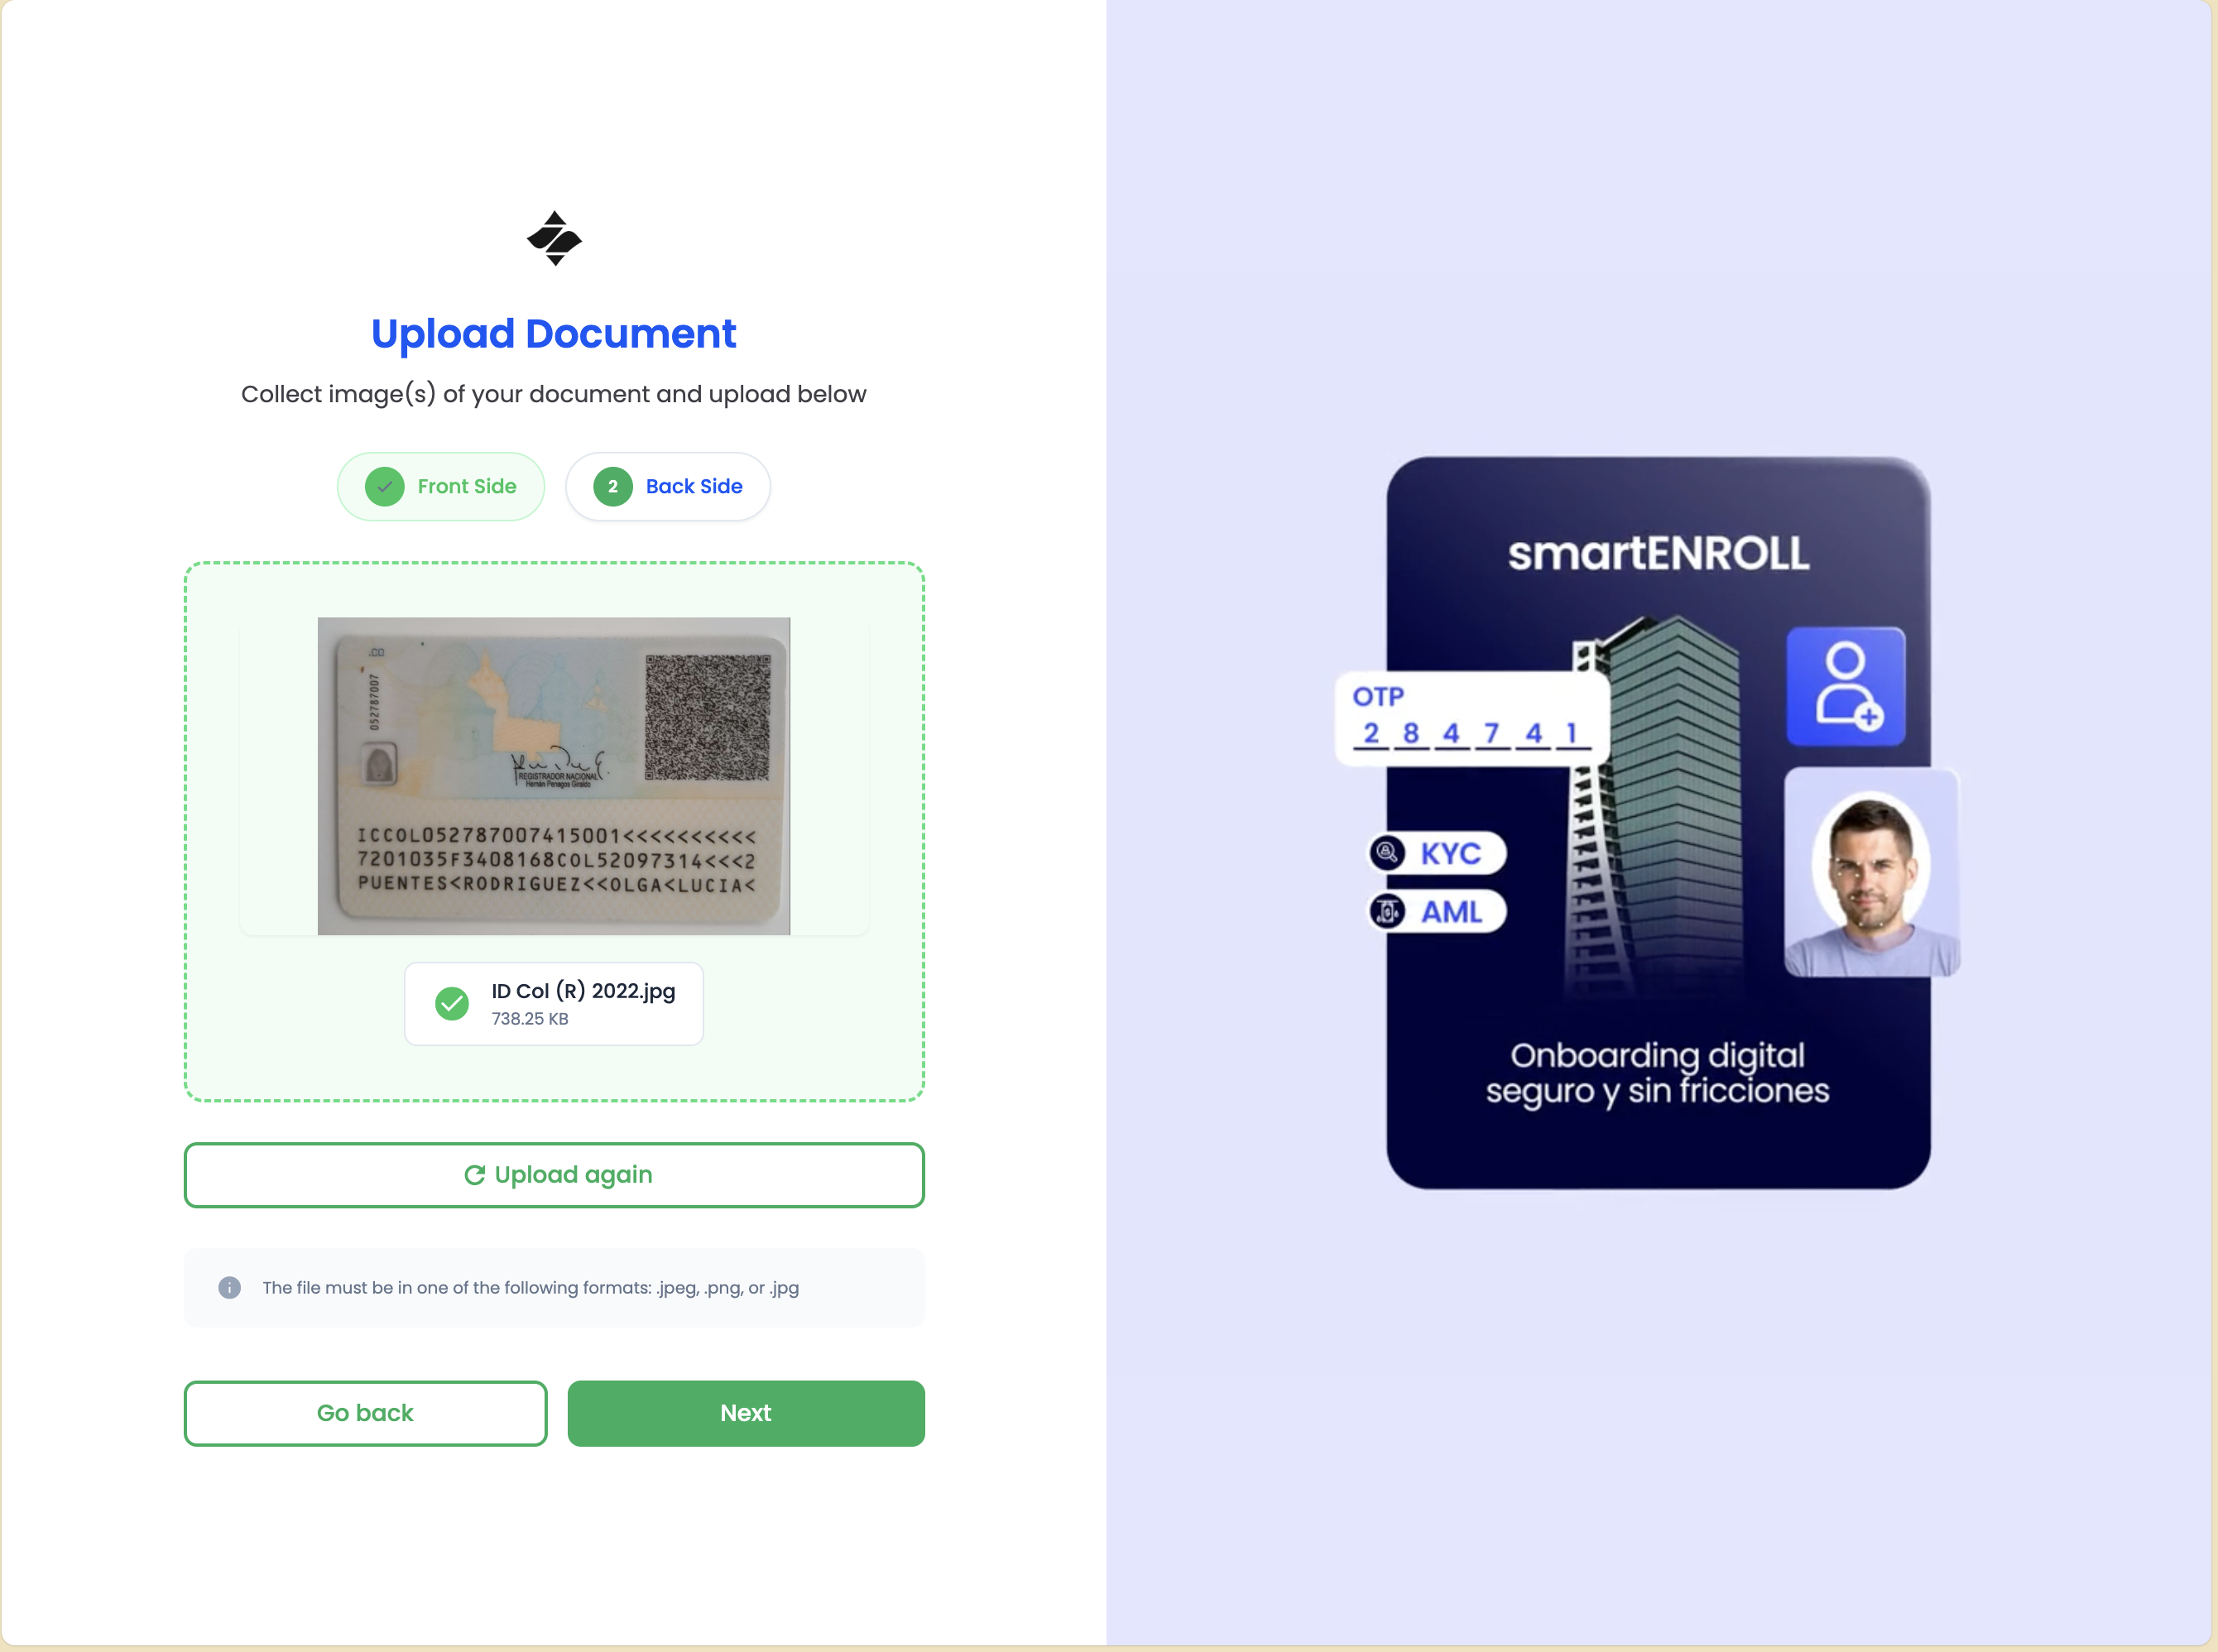
Many identity documents require both front and back sides to be verified. After successfully capturing the front side, users proceed to capture the back side.
Back Side Capture Process
The process is similar to front side capture:
- Follow Same Guidelines: Use the same lighting, positioning, and quality requirements
- Capture Back Side: Take a photo or upload the back side of the document
- Preview: Review the captured image
- Confirm or Retake: Proceed if satisfied, or retake if needed
Some documents may have important information on the back side (such as additional security features or expiration dates). Make sure both sides are clearly visible and readable.
After both sides are captured, the system processes the documents.
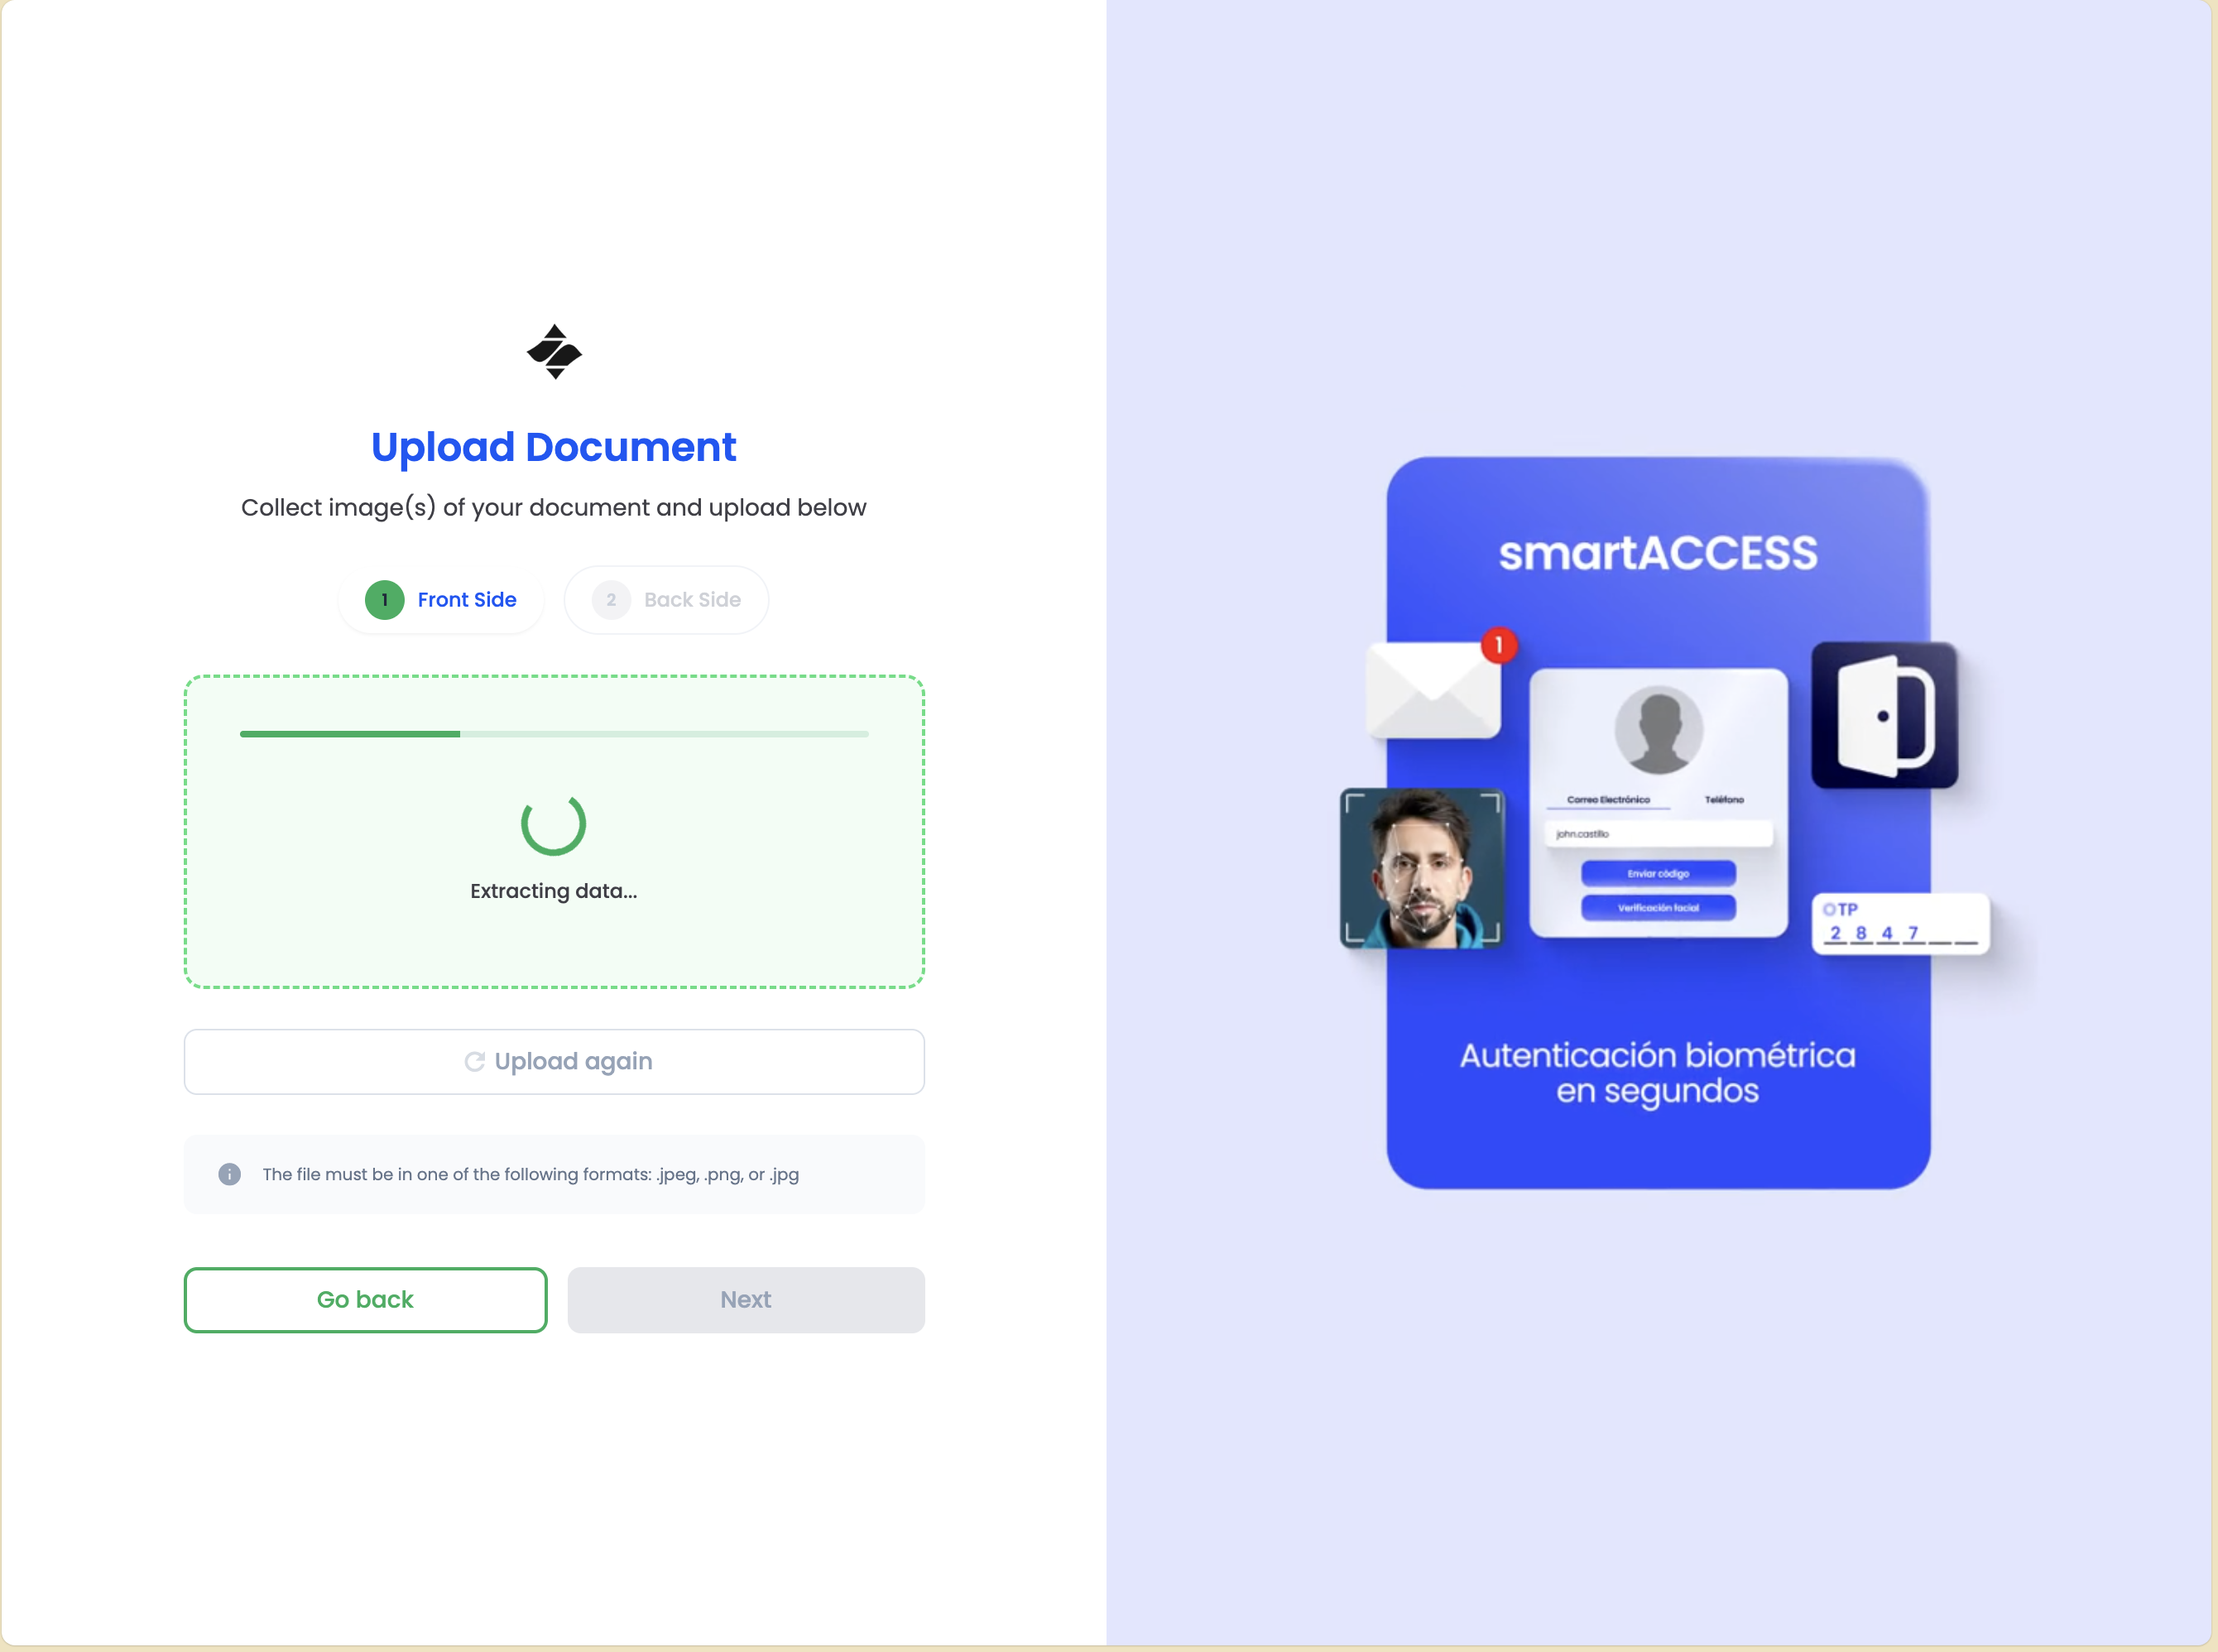
Step 8: Document Processing - OCR Extraction
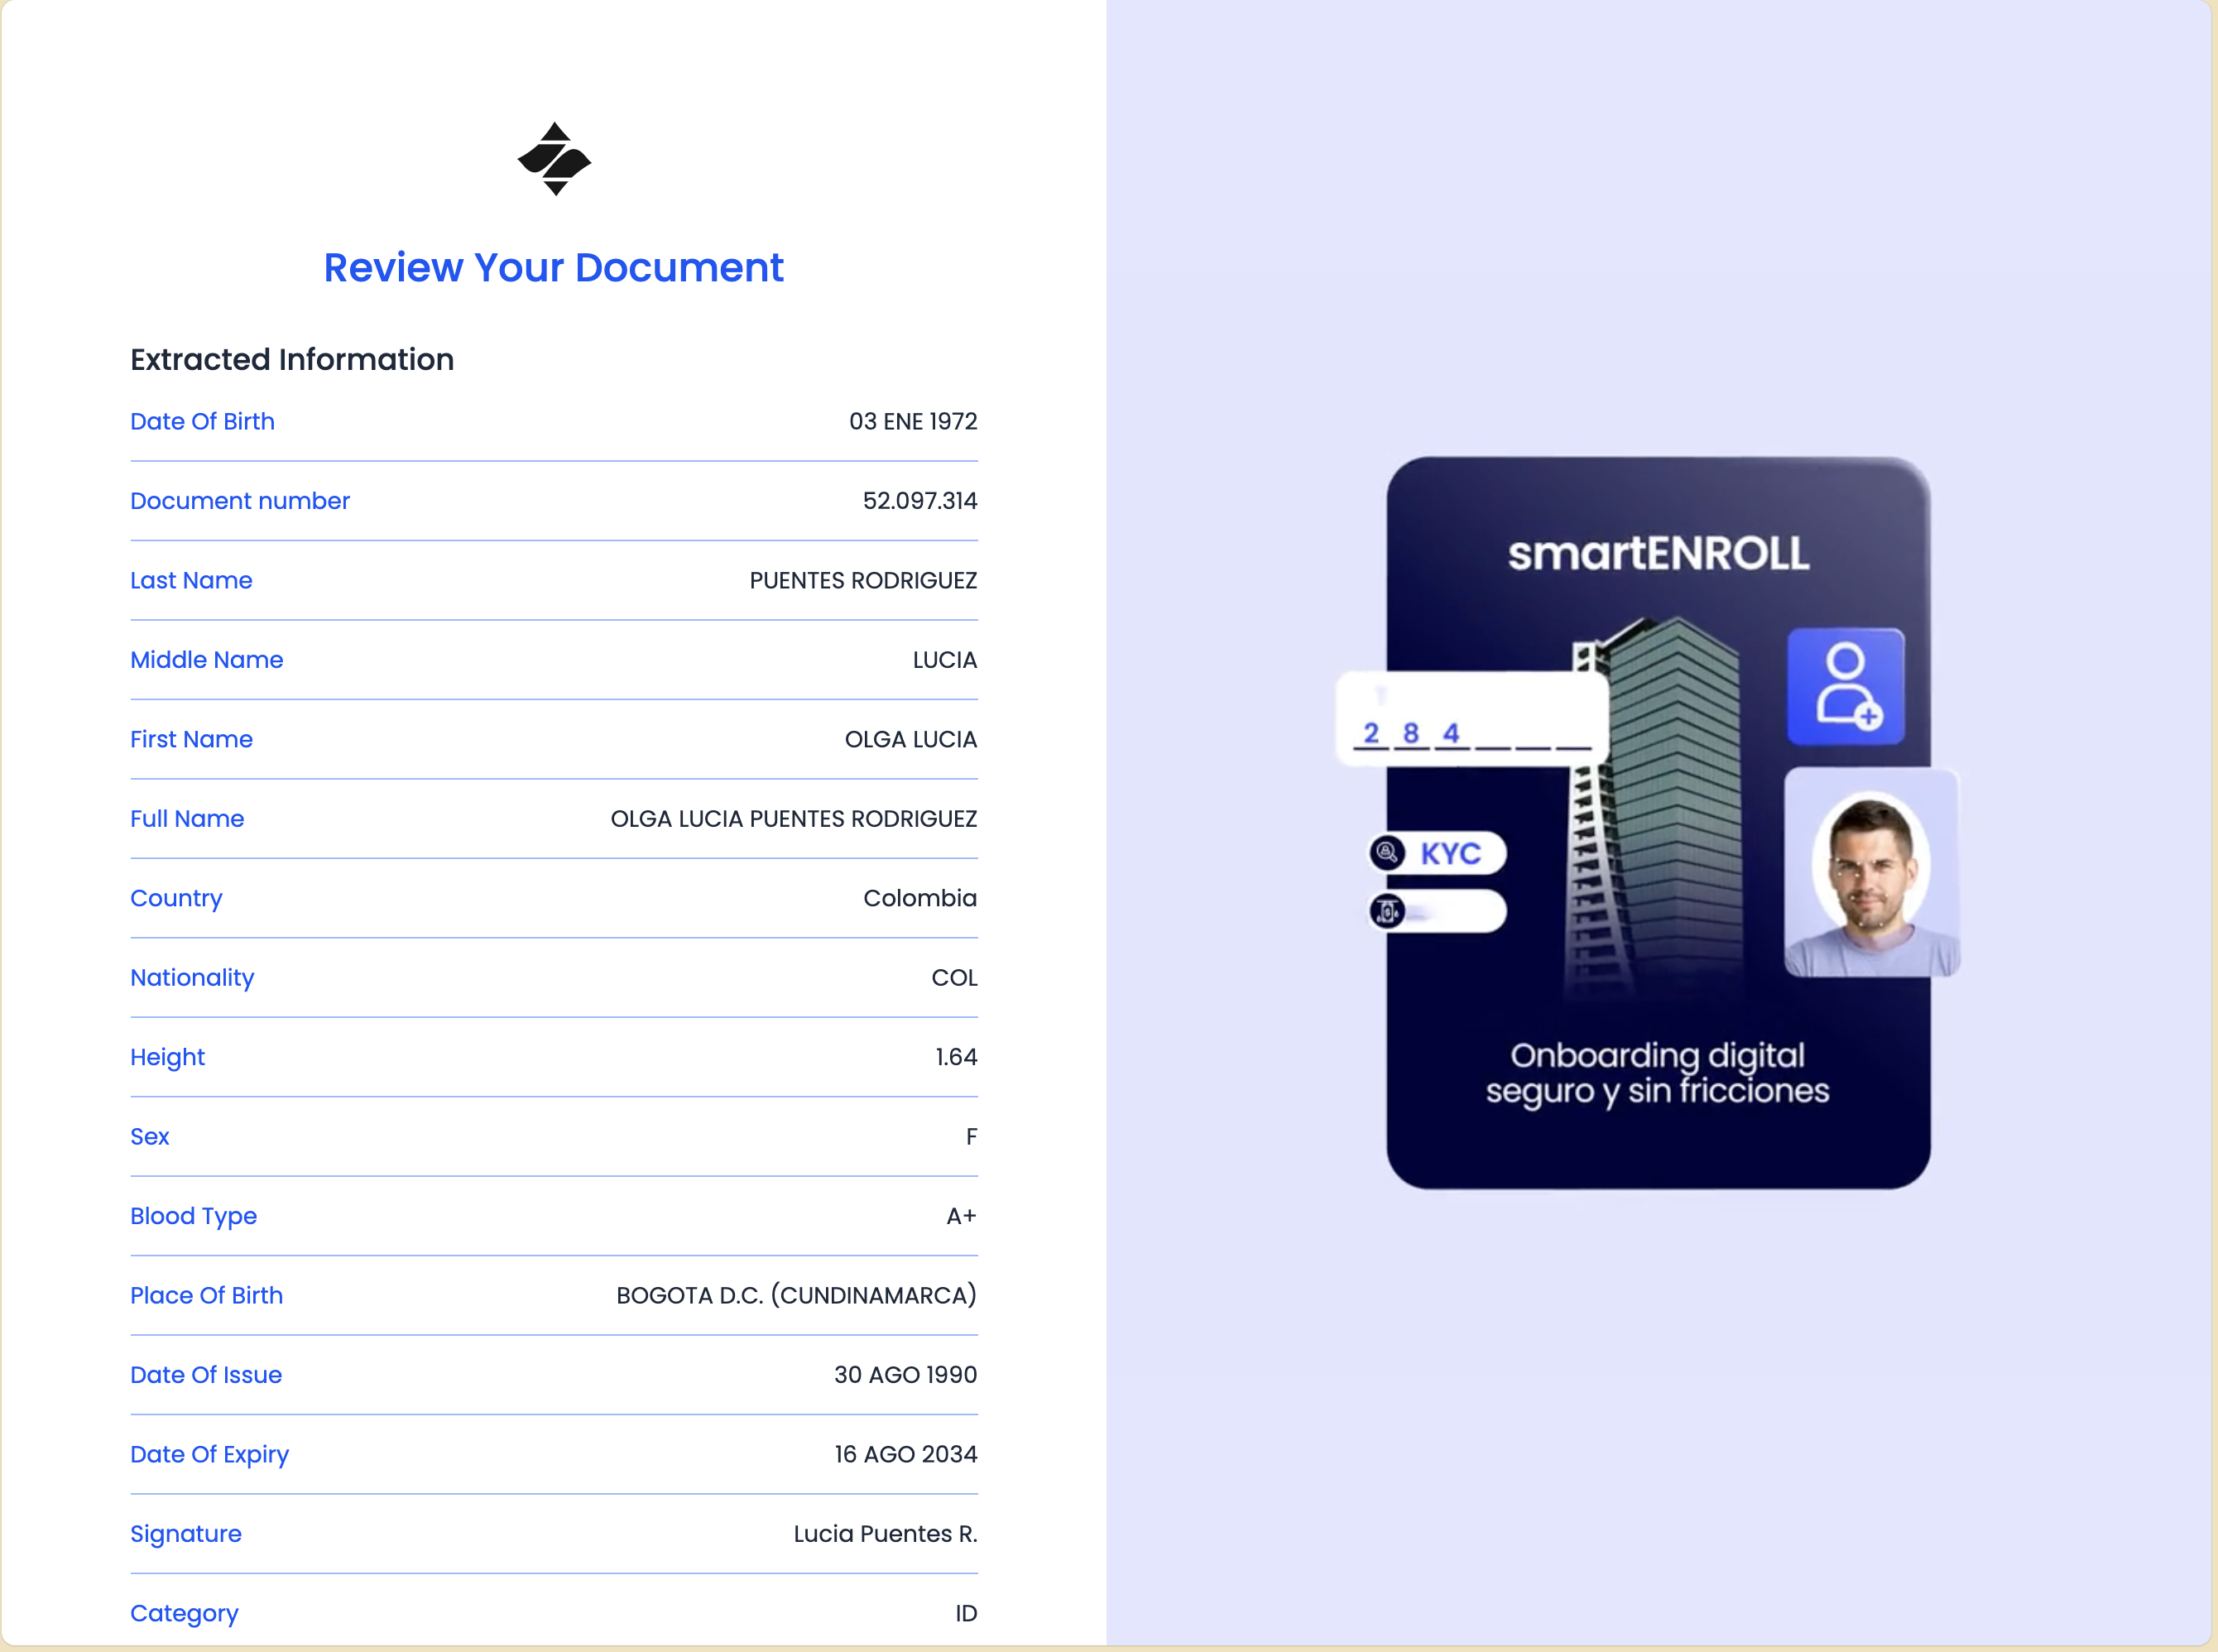
Once both sides of the document are uploaded, the system automatically processes the images using Optical Character Recognition (OCR) technology.
OCR Processing
The system extracts key information from the document:
- Personal Information:
- Full name
- Date of birth
- Document number
- Nationality
- Document Details:
- Document type
- Issue date
- Expiration date
- Issuing authority
- Security Features:
- Verification of security elements
- Tampering detection
- Authenticity checks
Processing Indicators
During processing, users typically see:
- Loading Indicator: Progress animation showing the system is working
- Status Messages: Updates on what the system is checking
- Estimated Time: How long processing might take
Processing usually takes 10-30 seconds. Please be patient and don't close the browser or app during this time.
After OCR extraction, the system validates the extracted data.
Step 9: Document Validation
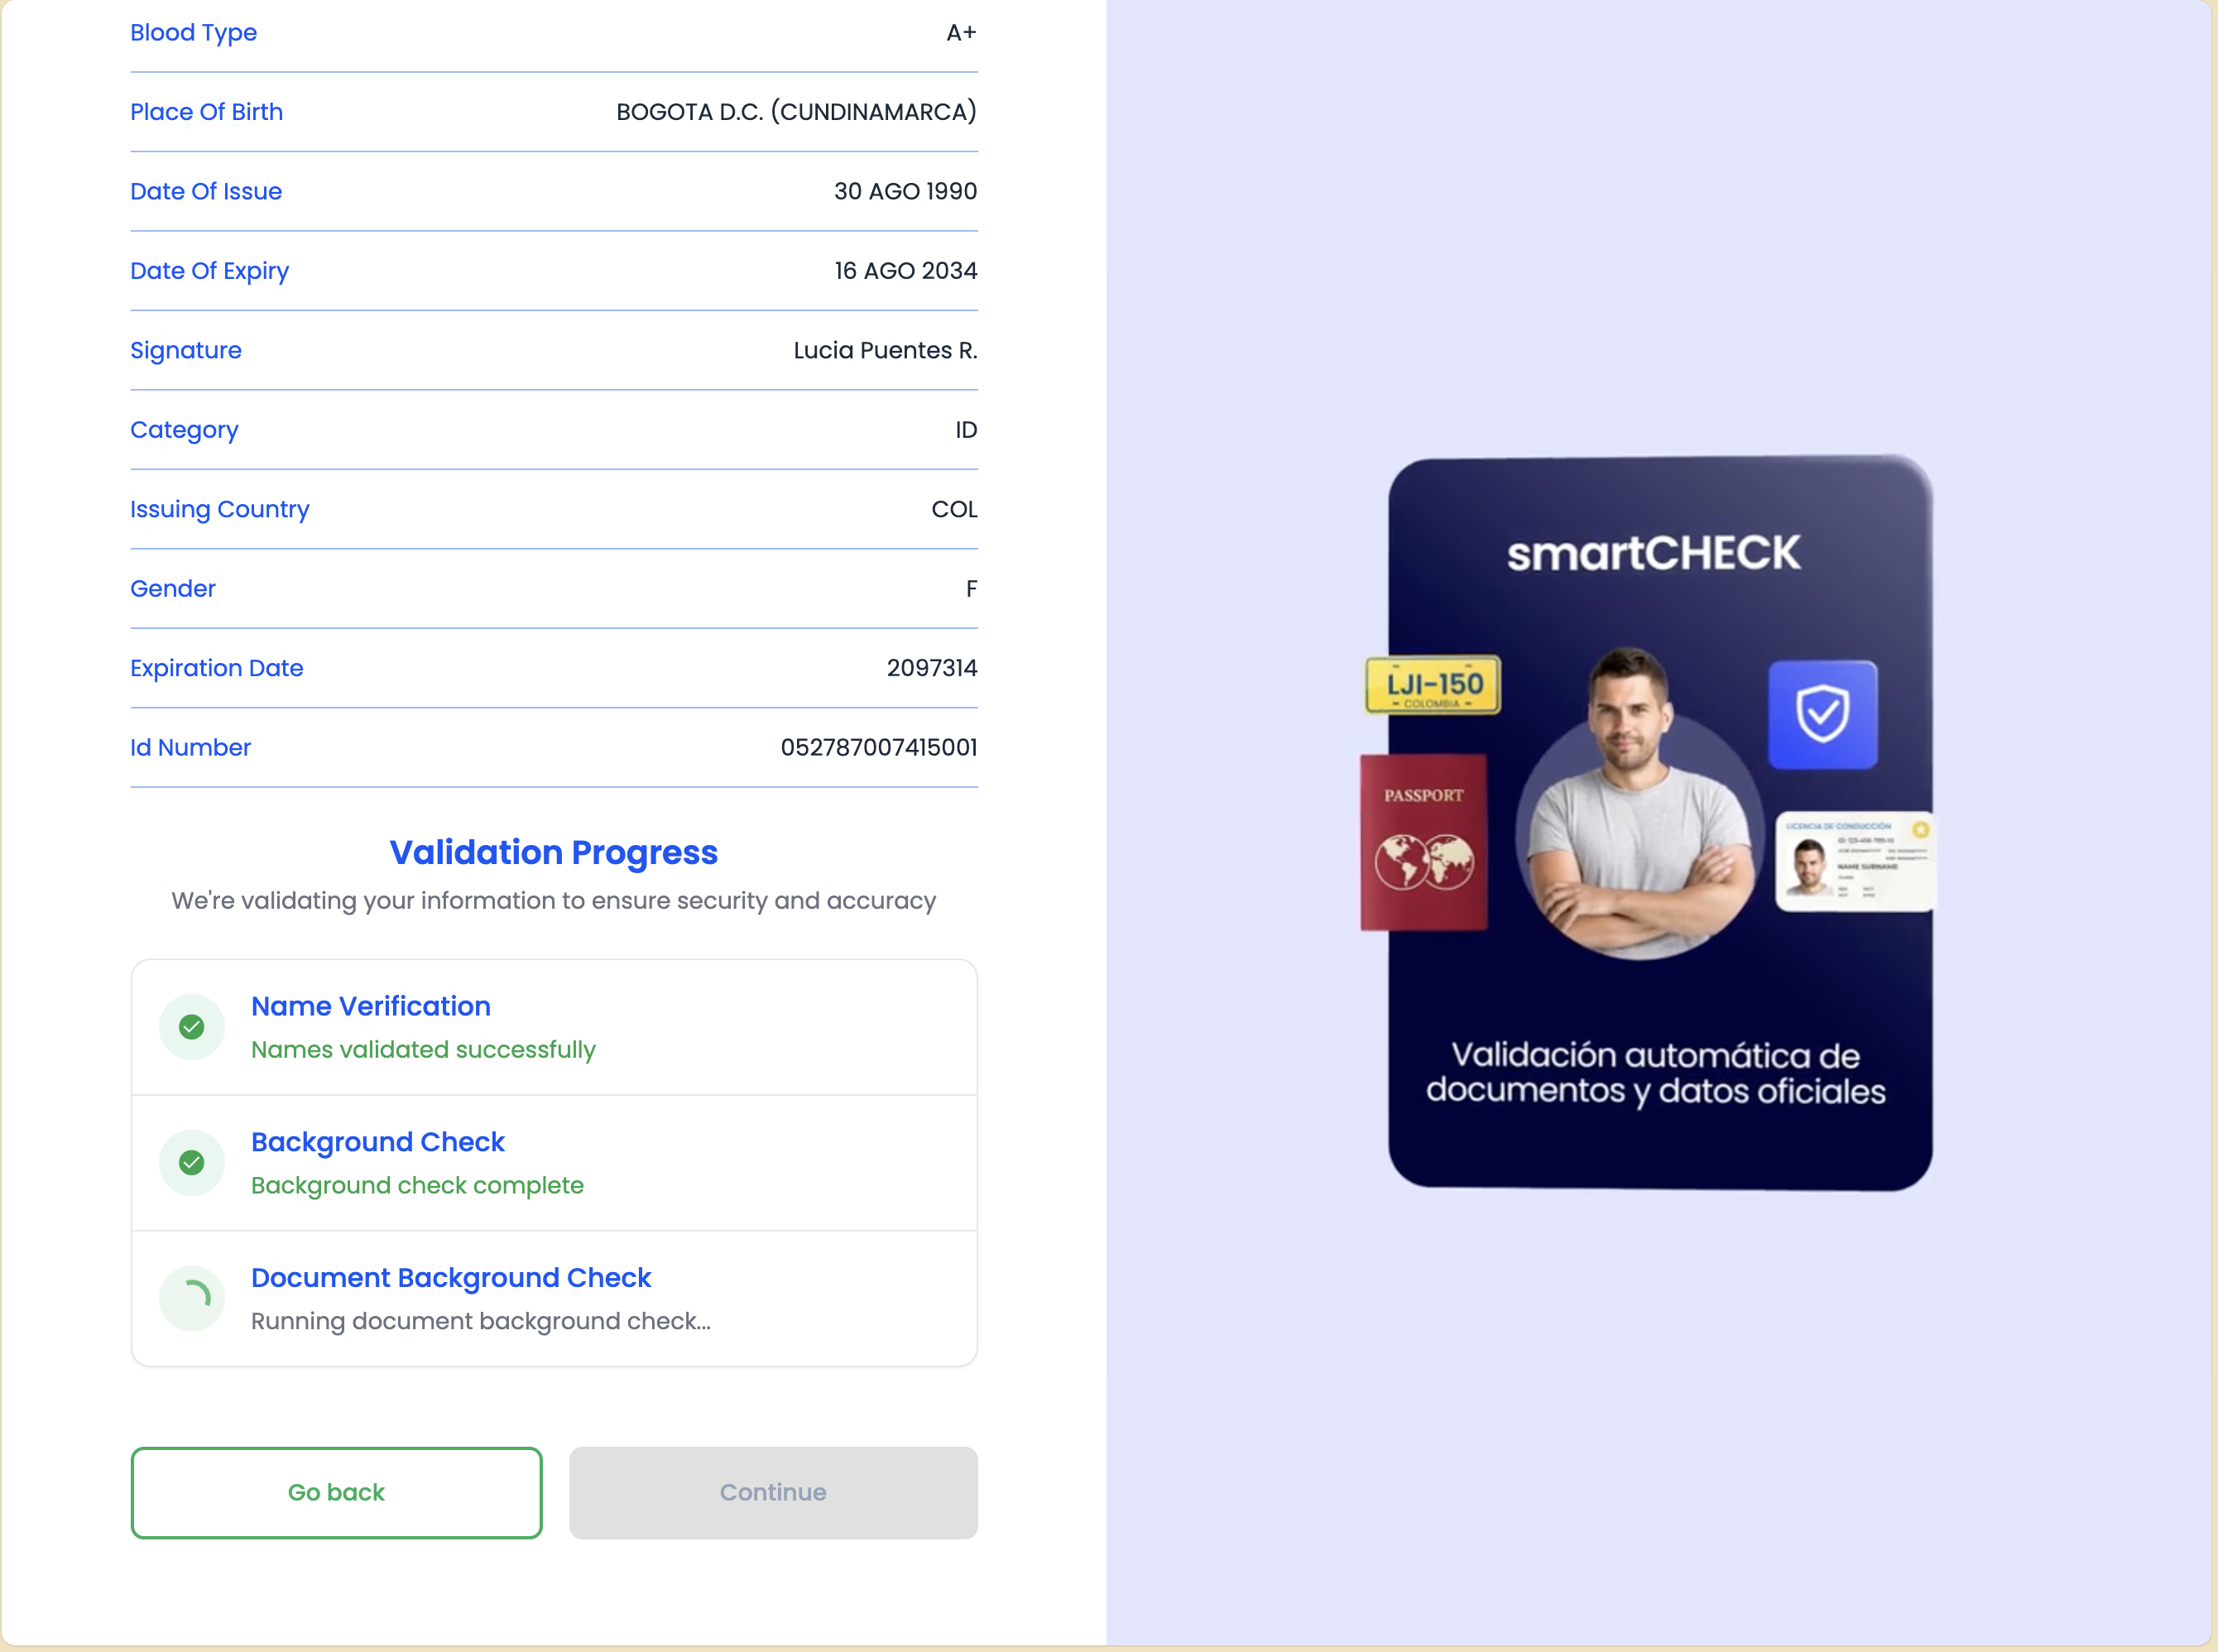
The system performs comprehensive validation checks on the document and extracted data.
Validation Checks
The system verifies:
-
Document Authenticity:
- Security features verification
- Tampering detection
- Format validation
- Expiration status
-
Data Consistency:
- Comparison with registration information (name matching)
- Cross-field validation
- Format validation (dates, numbers, etc.)
-
Database Screening (if enabled):
- Government database verification
- Blacklist checks
- Criminal record checks (if configured)
-
Quality Checks:
- Image clarity
- Readability of extracted text
- Completeness of information
Validation Results
- Success: If all validations pass, users proceed to biometric verification
- Issues Found: If problems are detected, users may see:
- Specific error messages
- Guidance on how to fix issues
- Option to retry document capture
If validation fails, carefully review the error message. Common issues include:
- Document expired or not yet valid
- Name mismatch with registration information
- Poor image quality
- Document not fully visible in the photo
After successful document validation, users proceed to biometric verification.
Step 10: Biometric Instructions
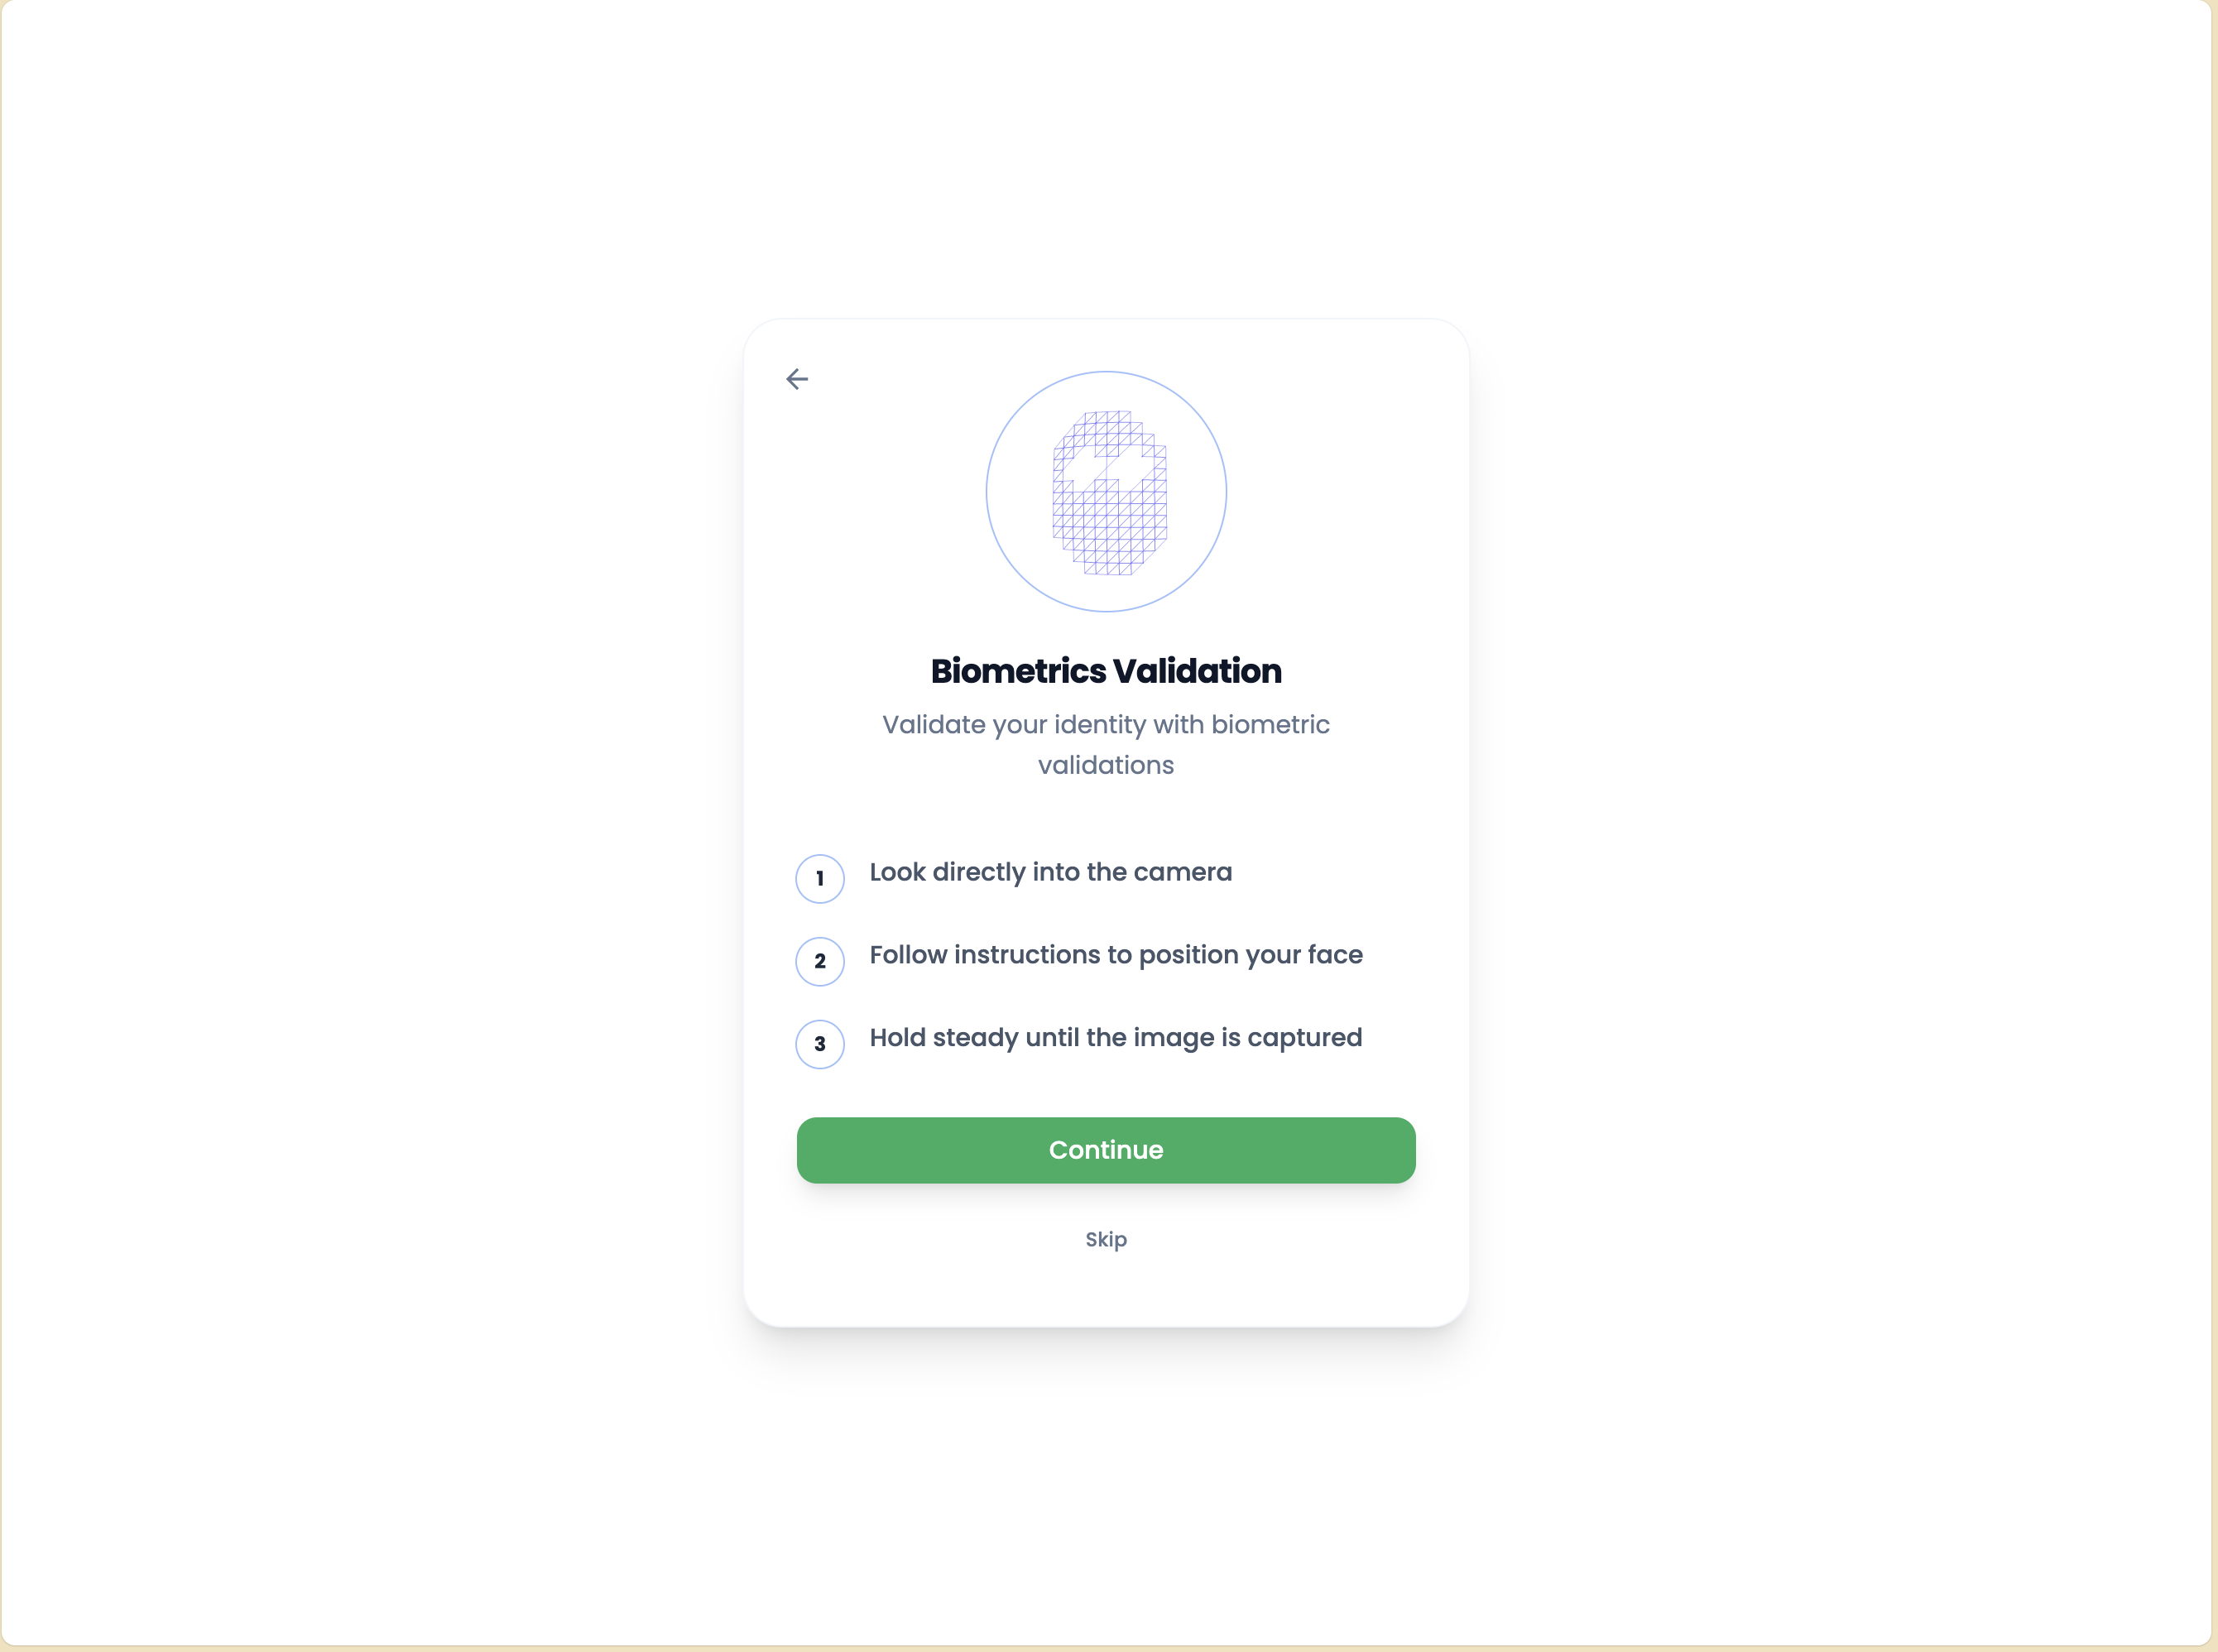
Before beginning biometric verification, users receive instructions on how to complete the facial recognition process successfully.
Preparation Guidelines
The instructions typically include:
-
Environment Requirements:
- Good lighting (natural light preferred)
- Plain background
- No face coverings (unless required for medical/religious reasons)
- Remove glasses if possible (or ensure no glare)
-
Positioning:
- Face the camera directly
- Keep face centered in the frame
- Maintain appropriate distance (not too close or far)
- Keep head straight, not tilted
-
Liveness Detection:
- Users may need to perform specific actions:
- Blink eyes
- Turn head left/right
- Smile
- Follow on-screen prompts
- These actions prove the user is a live person, not a photo or video
- Users may need to perform specific actions:
-
What to Expect:
- Duration of the process
- Number of attempts allowed
- What happens if verification fails
Find a quiet, well-lit space before starting biometric verification. Follow the on-screen instructions carefully for the best results.
After reviewing the instructions, users proceed to the actual biometric capture.
Step 11: Biometric Verification
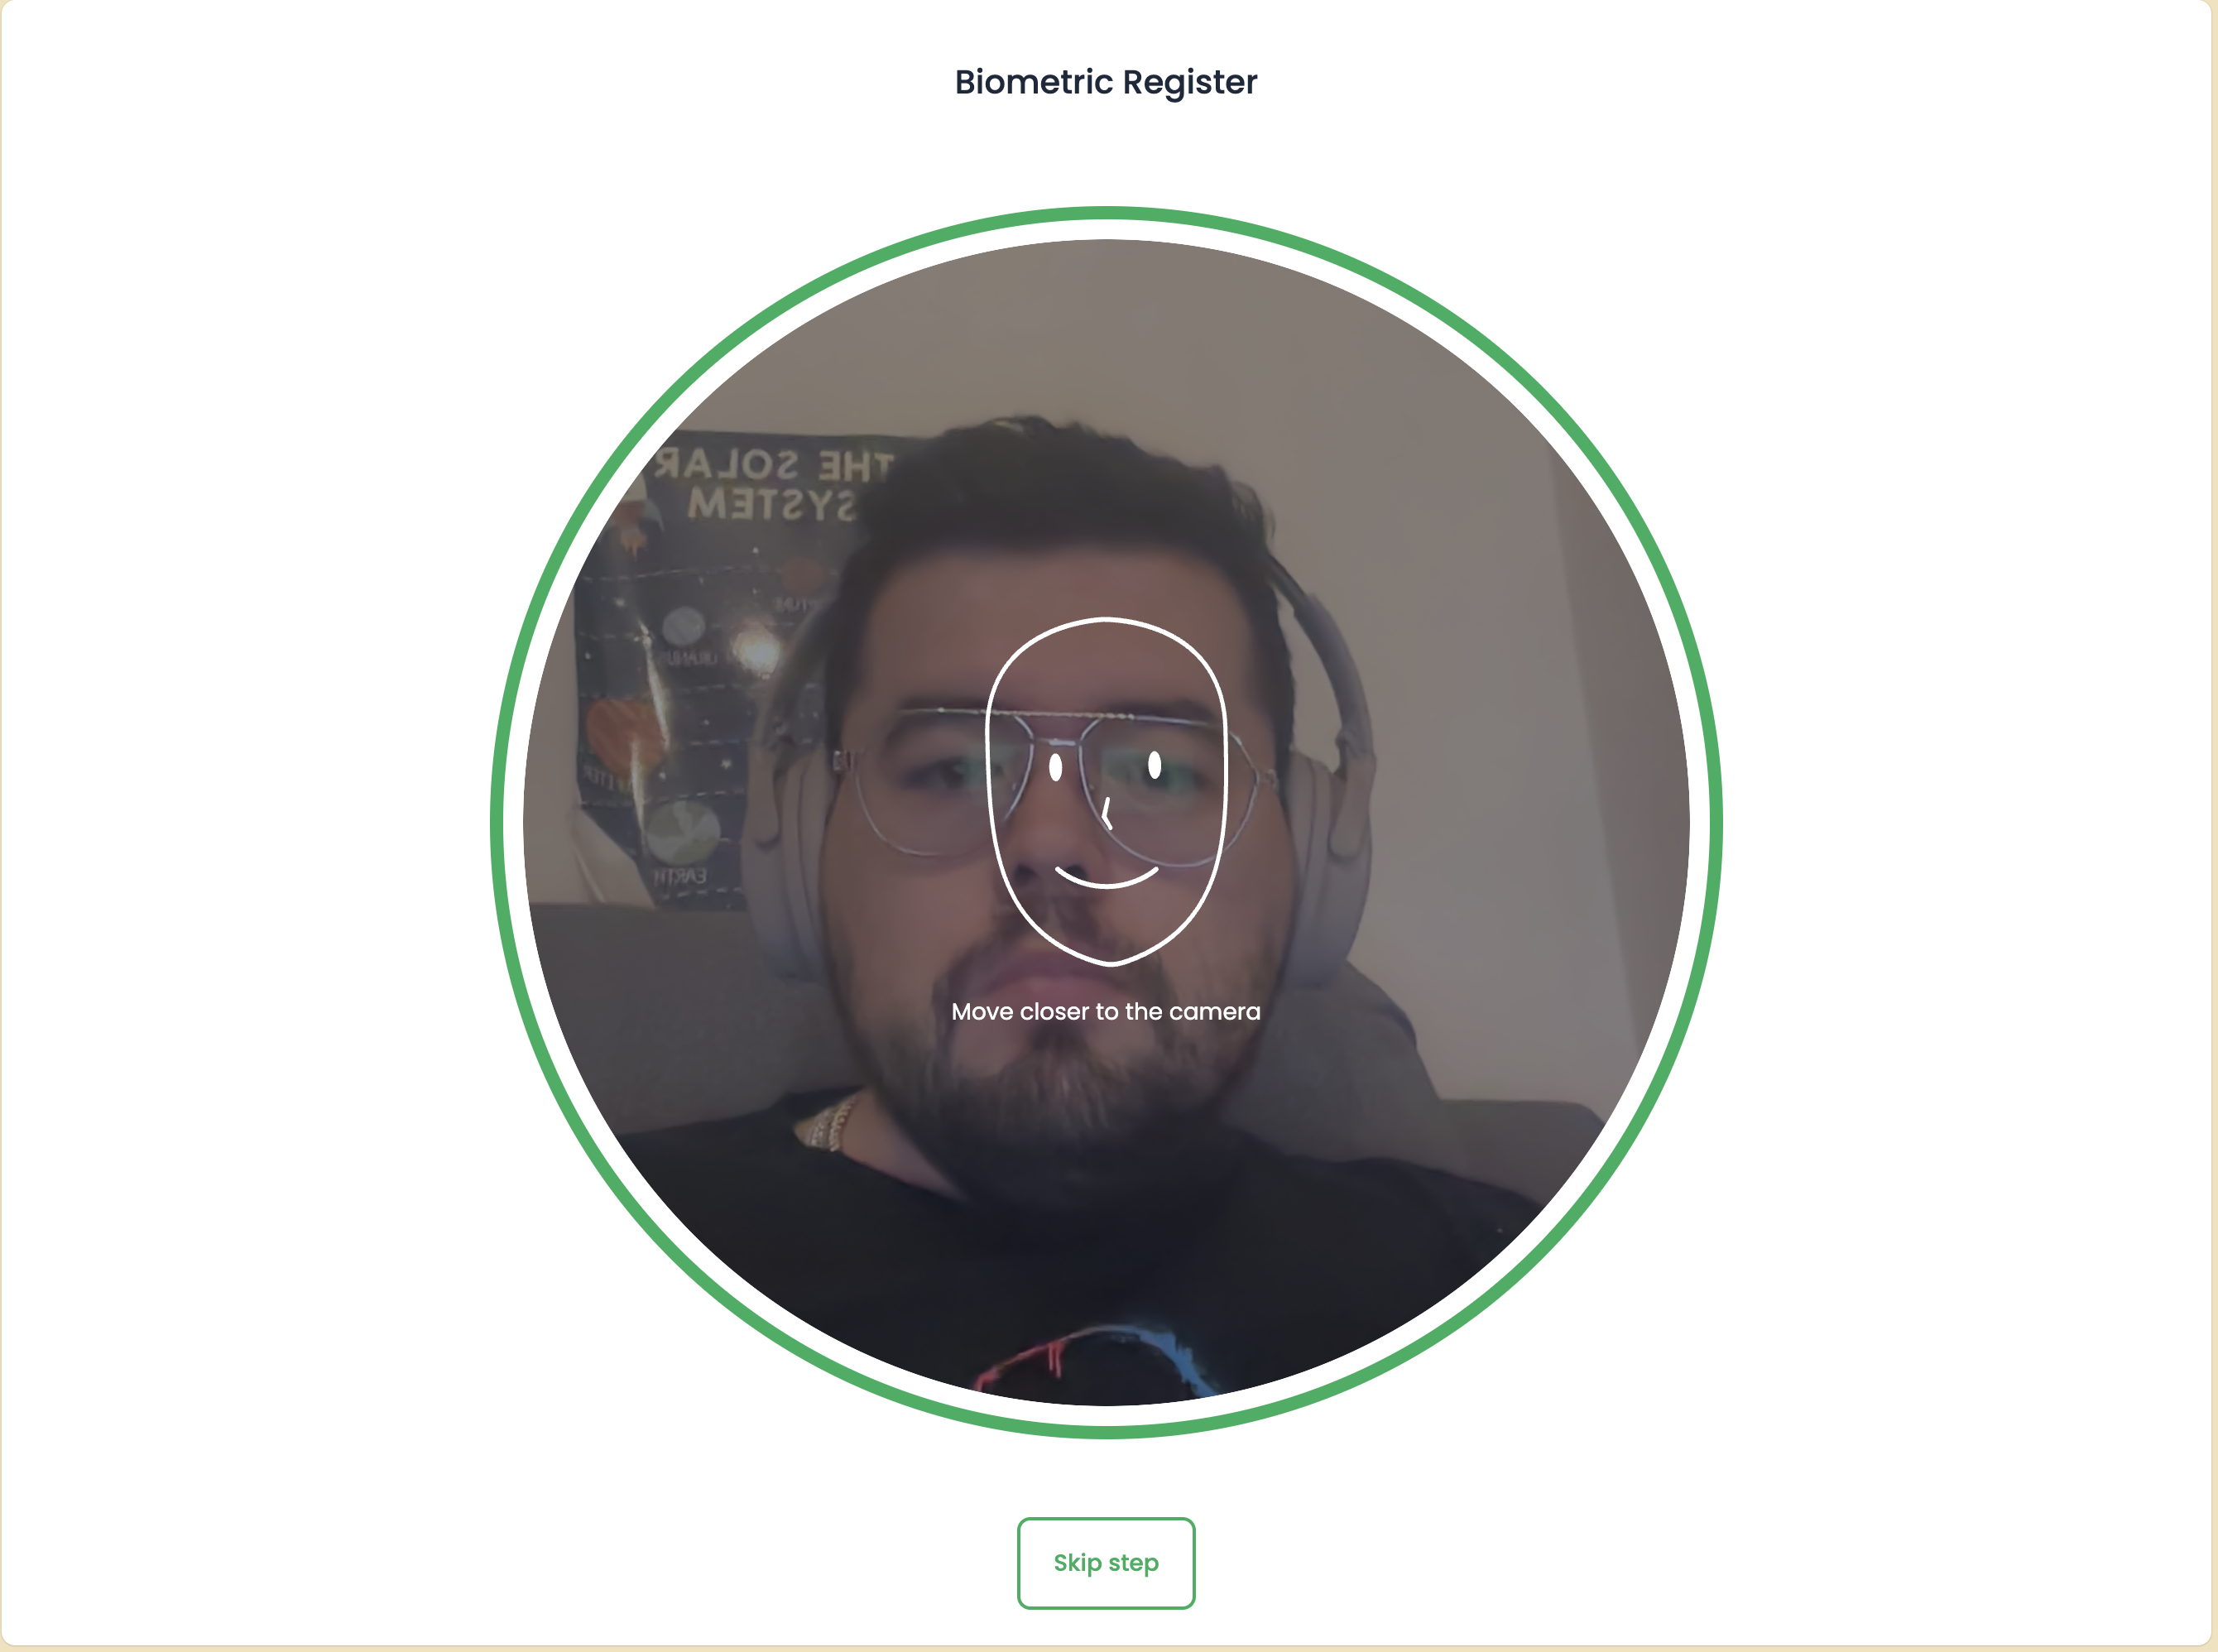
This is the final verification step where users complete facial recognition and liveness detection.
Biometric Verification Process
-
Camera Access: The system requests permission to access the device's camera (if not already granted).
-
Face Detection:
- The system detects the user's face in real-time
- Visual guides help position the face correctly
- Users see feedback on positioning and lighting
-
Liveness Detection:
- Users perform specific actions as prompted:
- Blink eyes when instructed
- Turn head in specified directions
- Smile or make facial expressions
- These actions prove the user is physically present
- Users perform specific actions as prompted:
-
Face Matching:
- The system compares the captured selfie with:
- The photo from the identity document
- The registration information
- A similarity score is calculated (must meet the configured threshold)
- The system compares the captured selfie with:
-
Real-time Feedback:
- Users see immediate feedback on:
- Face positioning
- Lighting quality
- Action completion
- Overall progress
- Users see immediate feedback on:
Attempt Limits
Users typically have 3-10 attempts (depending on configuration) to complete biometric verification successfully. If all attempts fail, users may need to:
- Contact support
- Retry the entire process
- Use alternative verification methods (if available)
- Ensure good lighting and a clear view of your face
- Follow all on-screen instructions carefully
- Don't use photos, videos, or masks
- Keep your face still during capture unless instructed to move
After successful biometric verification, users see the completion screen.
Step 12: Successful KYC Completion
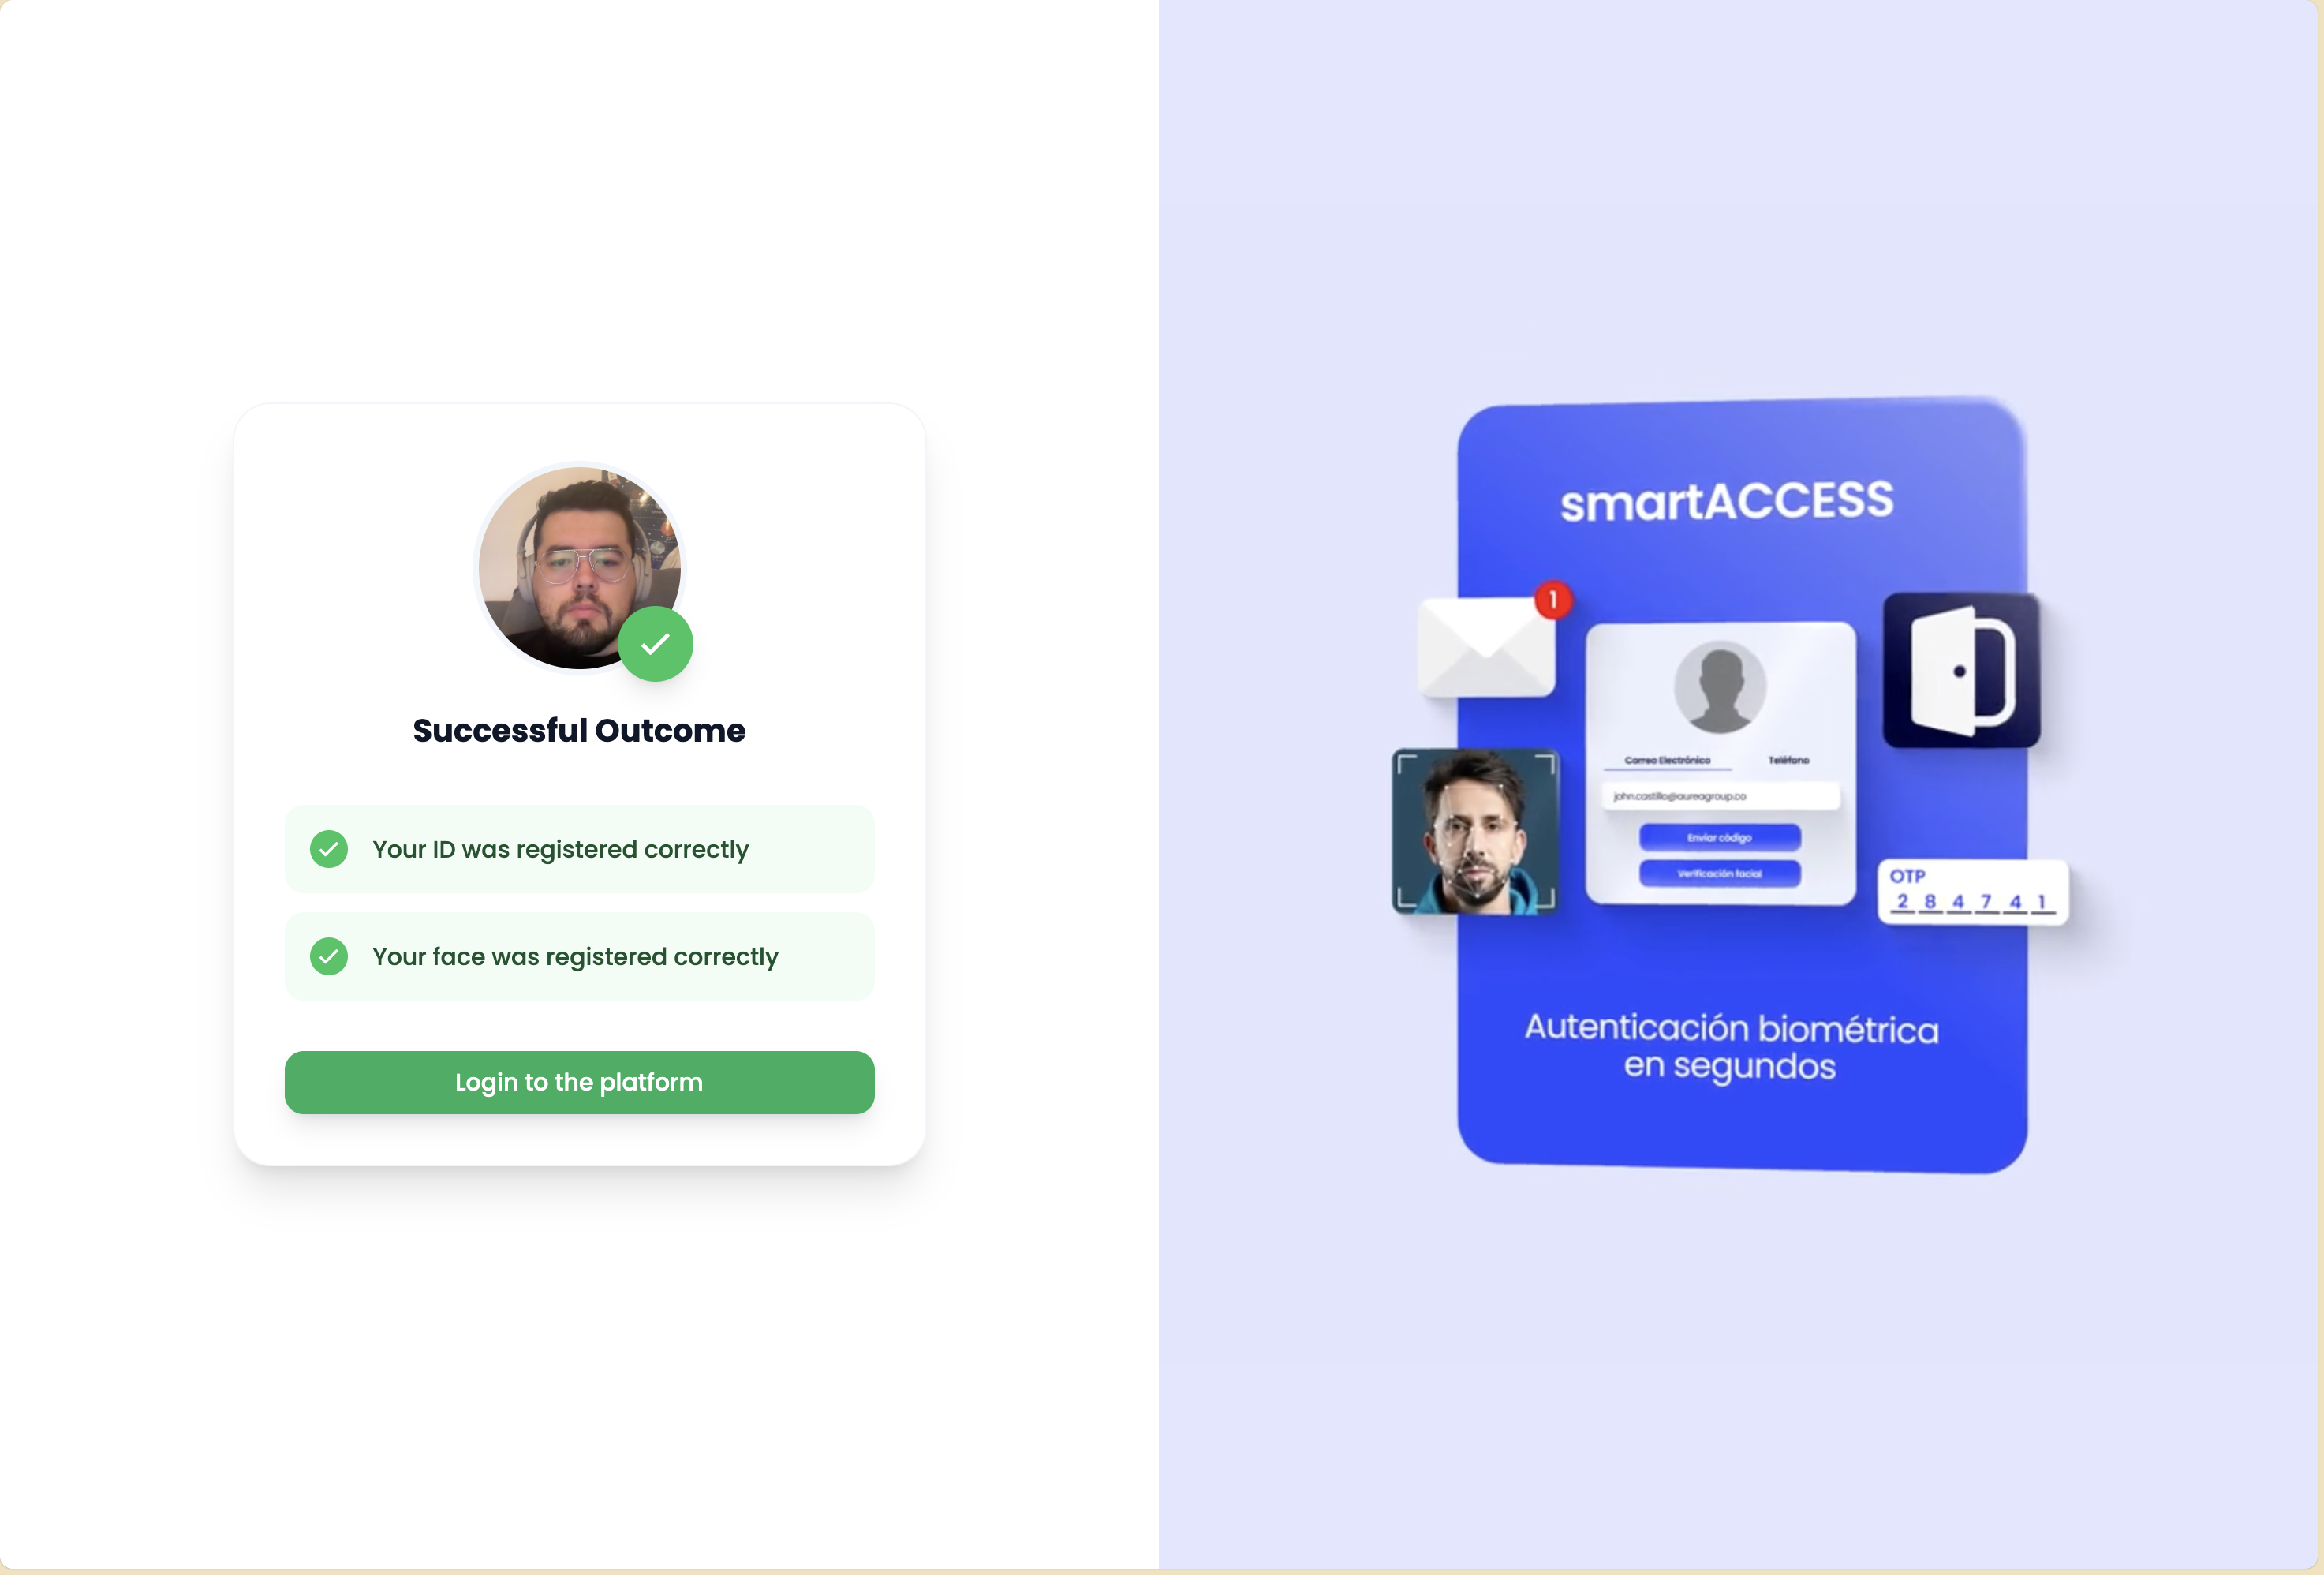
Congratulations! Upon successful completion of all verification steps, users see a confirmation screen.
Completion Screen Information
The completion screen typically displays:
- Success Message: Confirmation that KYC verification is complete
- Verification Status: Summary of completed steps:
- ✓ Email verified
- ✓ Phone verified
- ✓ Document verified
- ✓ Biometric verified
- Next Steps: Information about what happens next:
- Account activation
- Access to services
- Redirection to dashboard or application
- Reference Number: A unique verification reference (if provided)
- Support Information: Contact details for support if needed
What Happens Next
After completion:
- Account Activation: The user's account is typically activated immediately or within a short processing time
- Redirection: Users are automatically redirected to:
- The organization's application
- A welcome dashboard
- A custom URL configured by the organization
- Notification: Users may receive confirmation via email or SMS
- Access: Users can now access the services they signed up for
You've successfully completed the KYC verification process! Your account should now be fully activated and ready to use.
Common Issues and Solutions
Email Verification Issues
Problem: Not receiving verification code
- Solution: Check spam/junk folder, wait a few minutes, or request a new code
Problem: Code expired
- Solution: Click "Resend Code" to receive a new verification code
Phone Verification Issues
Problem: Not receiving SMS code
- Solution: Check network connectivity, ensure correct phone number, try WhatsApp option if available
Problem: Code not working
- Solution: Ensure you're entering the code correctly, request a new code if needed
Document Upload Issues
Problem: Document not recognized
- Solution: Ensure document is valid, not expired, and clearly visible in the photo
Problem: Poor image quality
- Solution: Improve lighting, ensure document is flat and in focus, retake the photo
Problem: Name mismatch
- Solution: Ensure the name on the document exactly matches the name entered during registration
Biometric Verification Issues
Problem: Face not detected
- Solution: Improve lighting, remove obstructions, ensure face is centered and clearly visible
Problem: Liveness detection fails
- Solution: Follow instructions carefully, perform actions as prompted, ensure good lighting
Problem: Face matching fails
- Solution: Ensure you're using the same person's document and selfie, check lighting and positioning
Best Practices for Users
Before Starting
- Prepare Documents: Have your valid identity document ready
- Check Environment: Ensure good lighting and a quiet space
- Stable Connection: Use a stable internet connection
- Time: Set aside 10-15 minutes to complete the process
During Verification
- Follow Instructions: Read and follow all on-screen instructions carefully
- Take Your Time: Don't rush through steps
- Quality Matters: Ensure photos are clear and documents are fully visible
- Be Patient: Processing may take a few moments
If You Encounter Issues
- Read Error Messages: Error messages provide specific guidance
- Retry: Many issues can be resolved by retrying the step
- Contact Support: If problems persist, contact the organization's support team
- Check Requirements: Ensure you meet all requirements (valid documents, correct information)
Privacy and Security
Data Protection
- All personal information is encrypted and securely stored
- Documents are processed securely and not shared with unauthorized parties
- Biometric data is processed according to strict security standards
- Your data is protected in compliance with privacy regulations
What Information is Collected
- Registration information (name, email, phone)
- Identity document images and extracted data
- Biometric data (facial recognition)
- Verification status and results
How Information is Used
- Identity verification and KYC compliance
- Account security and fraud prevention
- Service access and account management
- Compliance with legal and regulatory requirements
Support
If you need assistance during the KYC verification process:
- Check This Guide: Review the relevant section for your issue
- Contact Support: Reach out to the organization's support team
- Technical Issues: Report technical problems immediately
Don't hesitate to contact support if you encounter any issues. The support team is there to help you complete the verification process successfully.
Frequently Asked Questions
How long does the KYC process take?
The complete process typically takes 10-15 minutes, depending on how quickly you can complete each step and the processing time for document and biometric verification.
What if my document is expired?
Expired documents are generally not accepted. You'll need to use a valid, non-expired identity document.
Can I use a passport instead of a national ID?
Yes, if passports are enabled as an acceptable document type by the organization. Check the document selection screen for available options.
What happens if I fail biometric verification?
You typically have multiple attempts (3-10 depending on configuration). If all attempts fail, contact support for assistance.
Is my data secure?
Yes, all data is encrypted and processed according to strict security and privacy standards. Your information is protected and only used for verification purposes.
Can I complete the process on mobile?
Yes, the SmartEnroll KYC Flow is designed to work on both desktop and mobile devices. Mobile devices with good cameras are actually preferred for document and biometric capture.
Complete the process in one session to avoid having to restart. Make sure you have all required documents and a good internet connection before beginning.
Never share your verification codes or allow others to complete the verification process on your behalf. This is a security risk and may result in account suspension.